How to Spend One Day in Yosemite National Park (1 Day Itinerary)

If for some reason you only have 1 day in Yosemite National Park, here are 4 things you should do (in order):
- Hike the Mist Trail
- Explore Mariposa Grove
- Summit Taft Point
- Explore Glacier Point
These were our absolute favorite things we saw in Yosemite. If (when) we go back, we’ll gladly do them all over again!
As long as you start your day early – by around 7am – I think everything in this itinerary is more than doable.
You’ll be exhausted.
Your feet might hurt.
You might be wondering why you even bothered trying to do a day trip to Yosemite National Park!
But you will do it and it will be AWESOME.
It’s best to visit Yosemite in at least a weekend, but this 1 day itinerary is all you need to make the most of a trip to Yosemite National Park.
So get your National Park Pass ready and let’s spend 1 Day in Yosemite National Park!

#1 Tip for Yosemite in One Day: Arrive Early
The biggest tip we have for spending one day in Yosemite National Park is to arrive earlier than you think you need to.
Unless you are staying in the park, plan for an hour or two of driving just to get into Yosemite.
We stayed at the Forks Campground and it took us about 1.5 hours to get into Yosemite Valley.
Key Lesson: Get up early. You won’t regret it.
Let’s assume you took my advice and now you’re rolling into Yosemite Valley right around 7am. Parking in Yosemite is tough.
You’ll be hard-pressed to experience the park without loads of people, but we recommend you try to park in (or near) the Yosemite Village Parking Lot.
It’s closest to the shuttle stops. It’s in the heart of the valley floor. It’ll be easier to get around Yosemite from here.
I should repeat this in case I haven’t made it abundantly clear: get there early. Actually, get there earlier.
We arrived at 7:45am-ish during our trip.
And the parking lot was already filling up.
We got a spot. A nice little spot, actually.
But by the time we had laced up our hiking boots and were getting ready to grab the shuttle, spaces were almost full.
This is the last time I’ll say it: Get there early.
Oh, and just glance at this shuttle system map. It’ll be handy for your overall Yosemite Itinerary.
Mist Trail, Vernal Fall, & Nevada Fall (7am – 12pm)
We hope you stretched because this hike – if you go the entire way (which you should) – is stunning.
You have three options for this trail:
- Short: 1.5 miles (round trip) to a footbridge looking up at Vernal Falls
- Medium: 3 miles (round trip) to the top of Vernal Falls via a 600 step stairway up the side of the waterfall!
- Long: 7 miles (round trip) to the top of Nevada Falls. This will give you everything you possibly need to see on this trail!
If you do the long route, you can expect it to take between 4-5 hours.
It’s tough.
It’s an incline almost the entire way.
It will even hurt on the way down.
But, boy oh boy, is it just spectacular.
It’s famous for a reason. And it gave us some of the most spectacular views in the park
There is nothing more satisfying than a long hike with a rewarding view.
Even though hundreds of people have done it before you and hundreds more are coming right behind you, it’s thrilling to know that you did it.
We recommend it early because it gets packed (especially during peak season).
For reference, we hiked this trail in the mid-afternoon and it felt like we were moving with a herd.
Avoid that, get there early (ok last time), and enjoy!
Mist Trail Basics
- Double-check if the trail is open
- Stop at Shuttle Stop 16 toward Happy Isles
- Grab your sturdiest hiking boots
Your first stop is to a footbridge with a view of Vernal Falls. It is about 0.75 miles from the trailhead to the bridge.
It’s pretty much all an incline to the bridge. In fact, it’s pretty much an incline all the way to the top of Nevada Falls (more on that later).
So be prepared by bringing water and snacks. We always bring more than we need. Better safe than sorry!
Once you reach this footbridge there will be an area for restrooms and for refilling your water. I definitely recommend going. Even if you don’t feel like it, I promise that the ensuing few hours will move your bowels (just being honest).
Here’s where the fun begins.
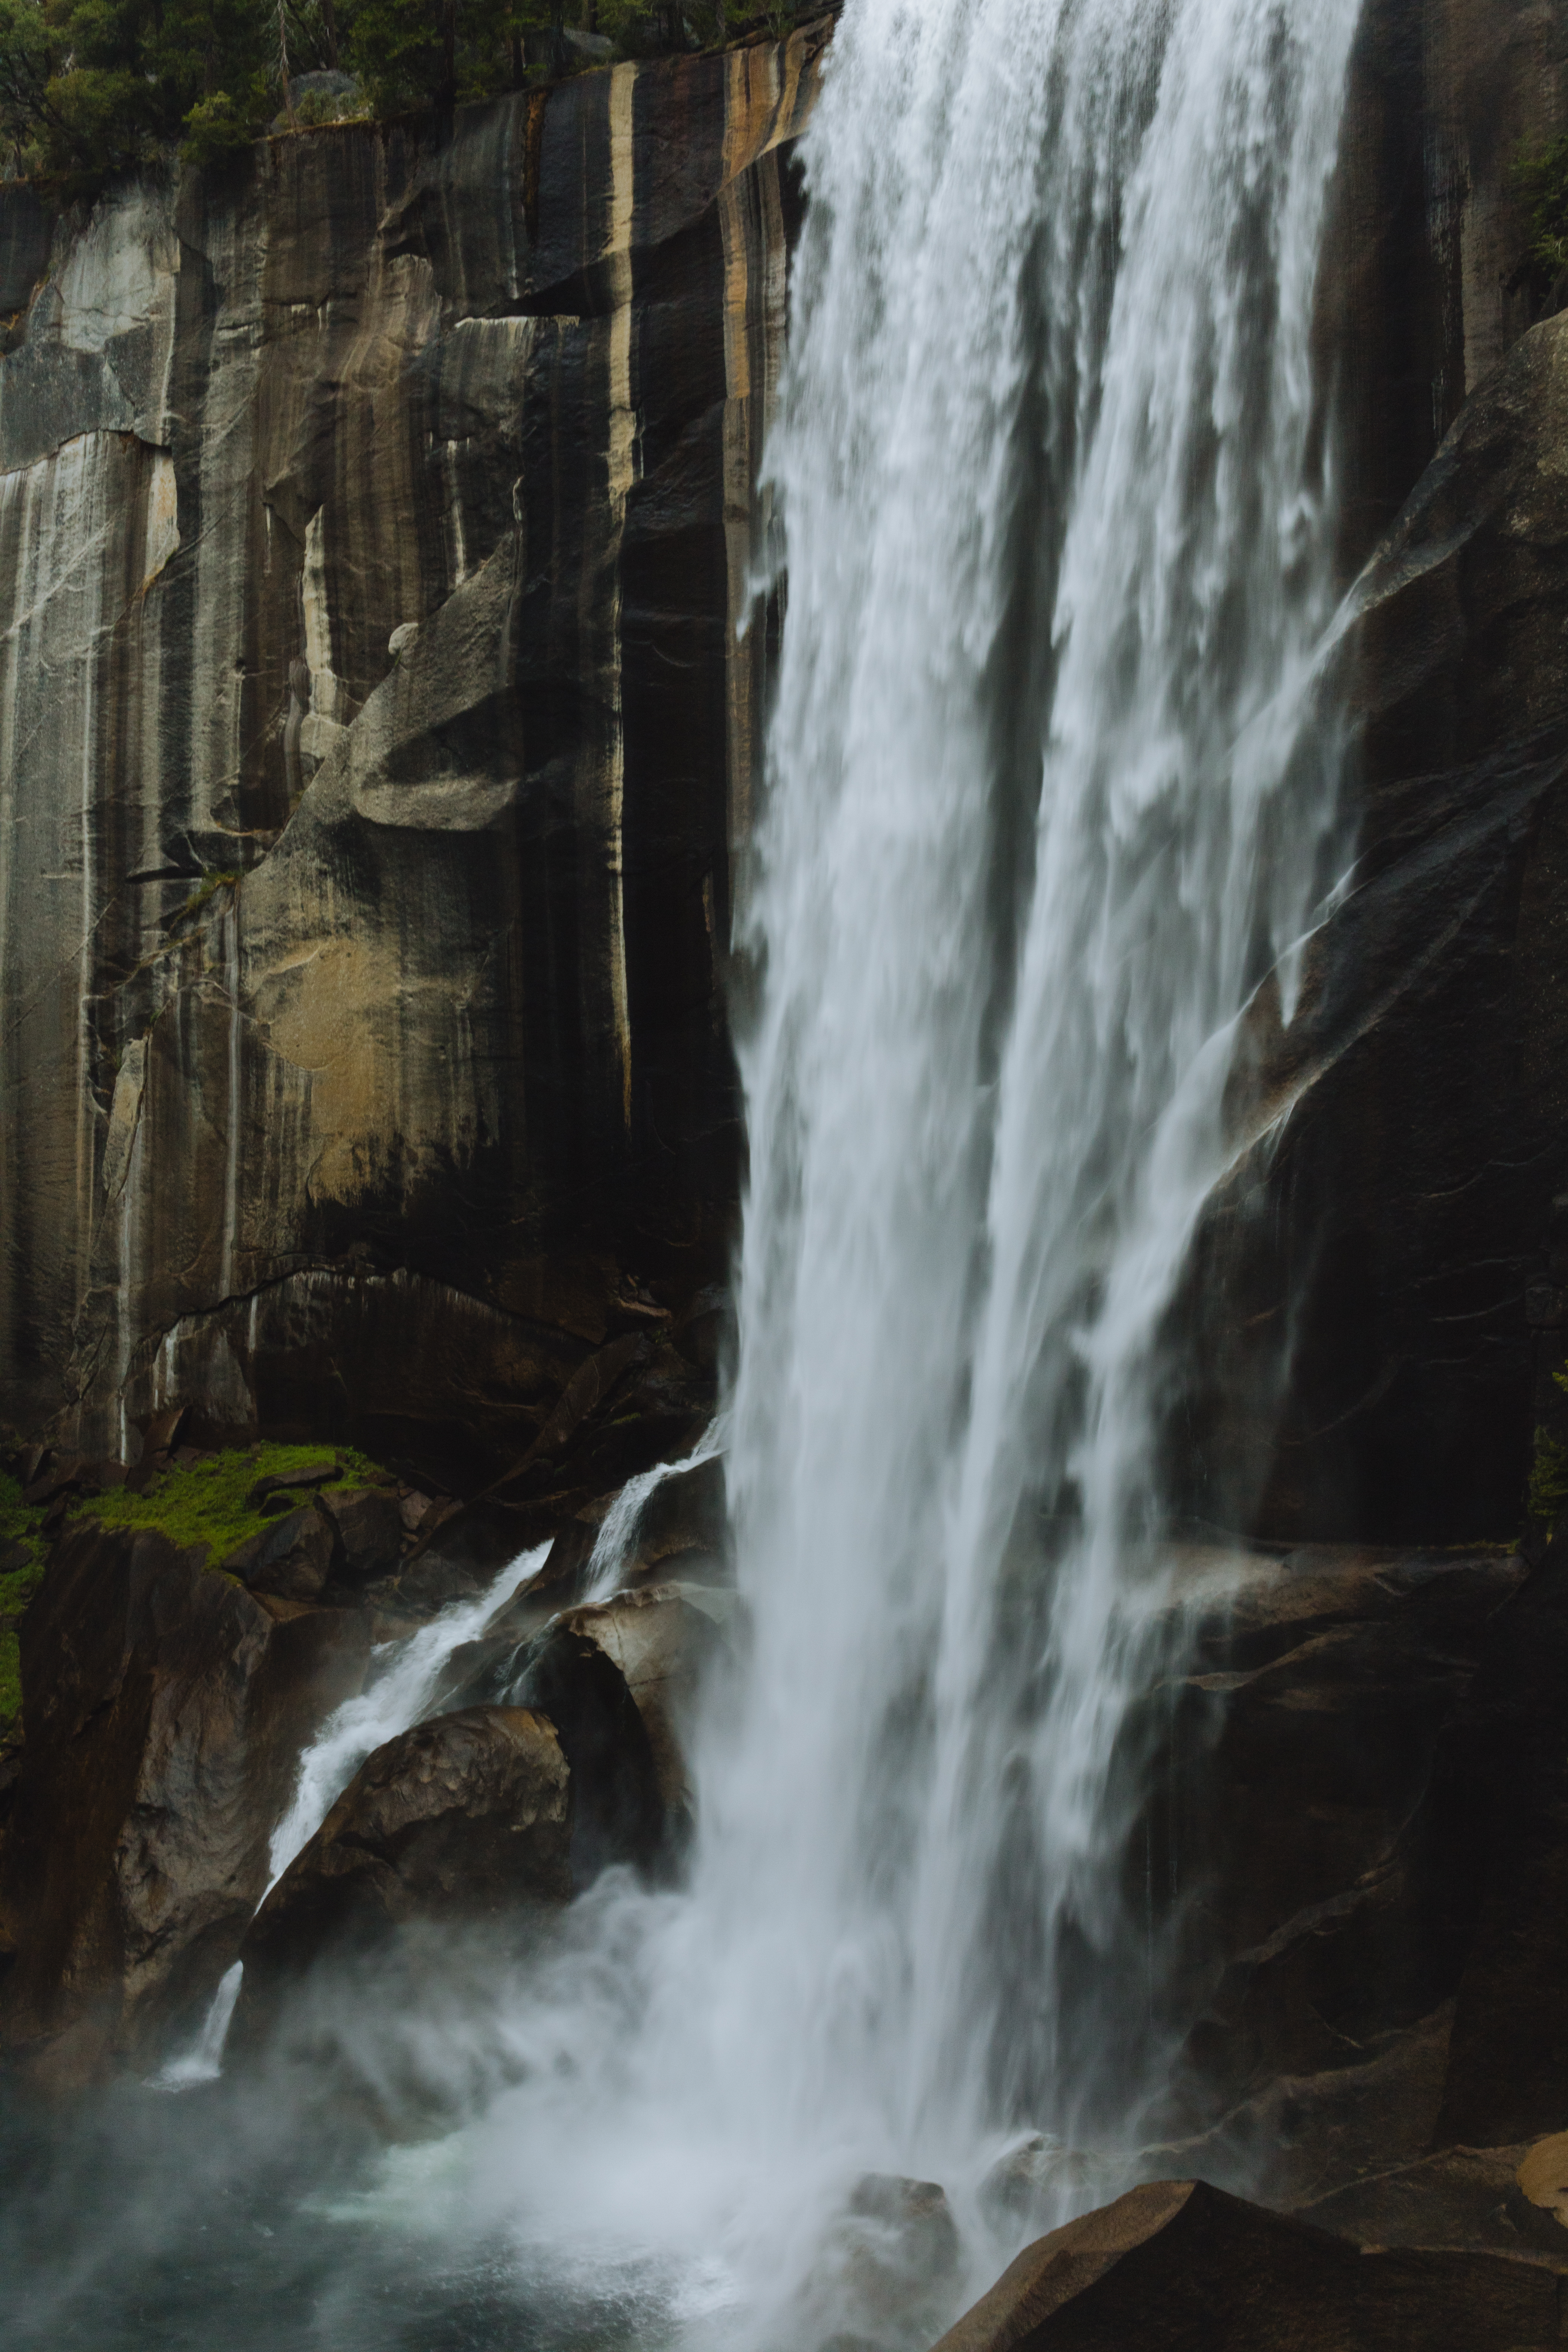
Vernal Fall

The hike to the top of Vernal Falls is – in a word – wet.
It is called the Mist Trail for a reason.
The highlight of the hike is a set of 600 granite steps right alongside the waterfall. In peak season (early Spring and Summer), the falls are thunderous.
You will most definitely get wet. So bring a poncho or rain jacket or layers. Whatever you need to stay dry (though on a hot day I can imagine this water feeling refreshing af).
Be careful going up these steps.
The water makes the granite quite slippery. We never felt in danger or anything. But there were a few moments where I had to pause, secure my footing, and then keep going.
There are a few pullouts up the stairs for pictures or to allow folks to pass.
If you go mid-day, you are guaranteed to run into a crowd here. We certainly did and it was a bit uncomfortable.
But once you make it to the top it’s breathtaking.
It was fun to glance down and see the tiny people making their way up.
“We did that,” I said, “we really did that!”
Tired, wet, but satisfied, time to turn toward Nevada Falls.
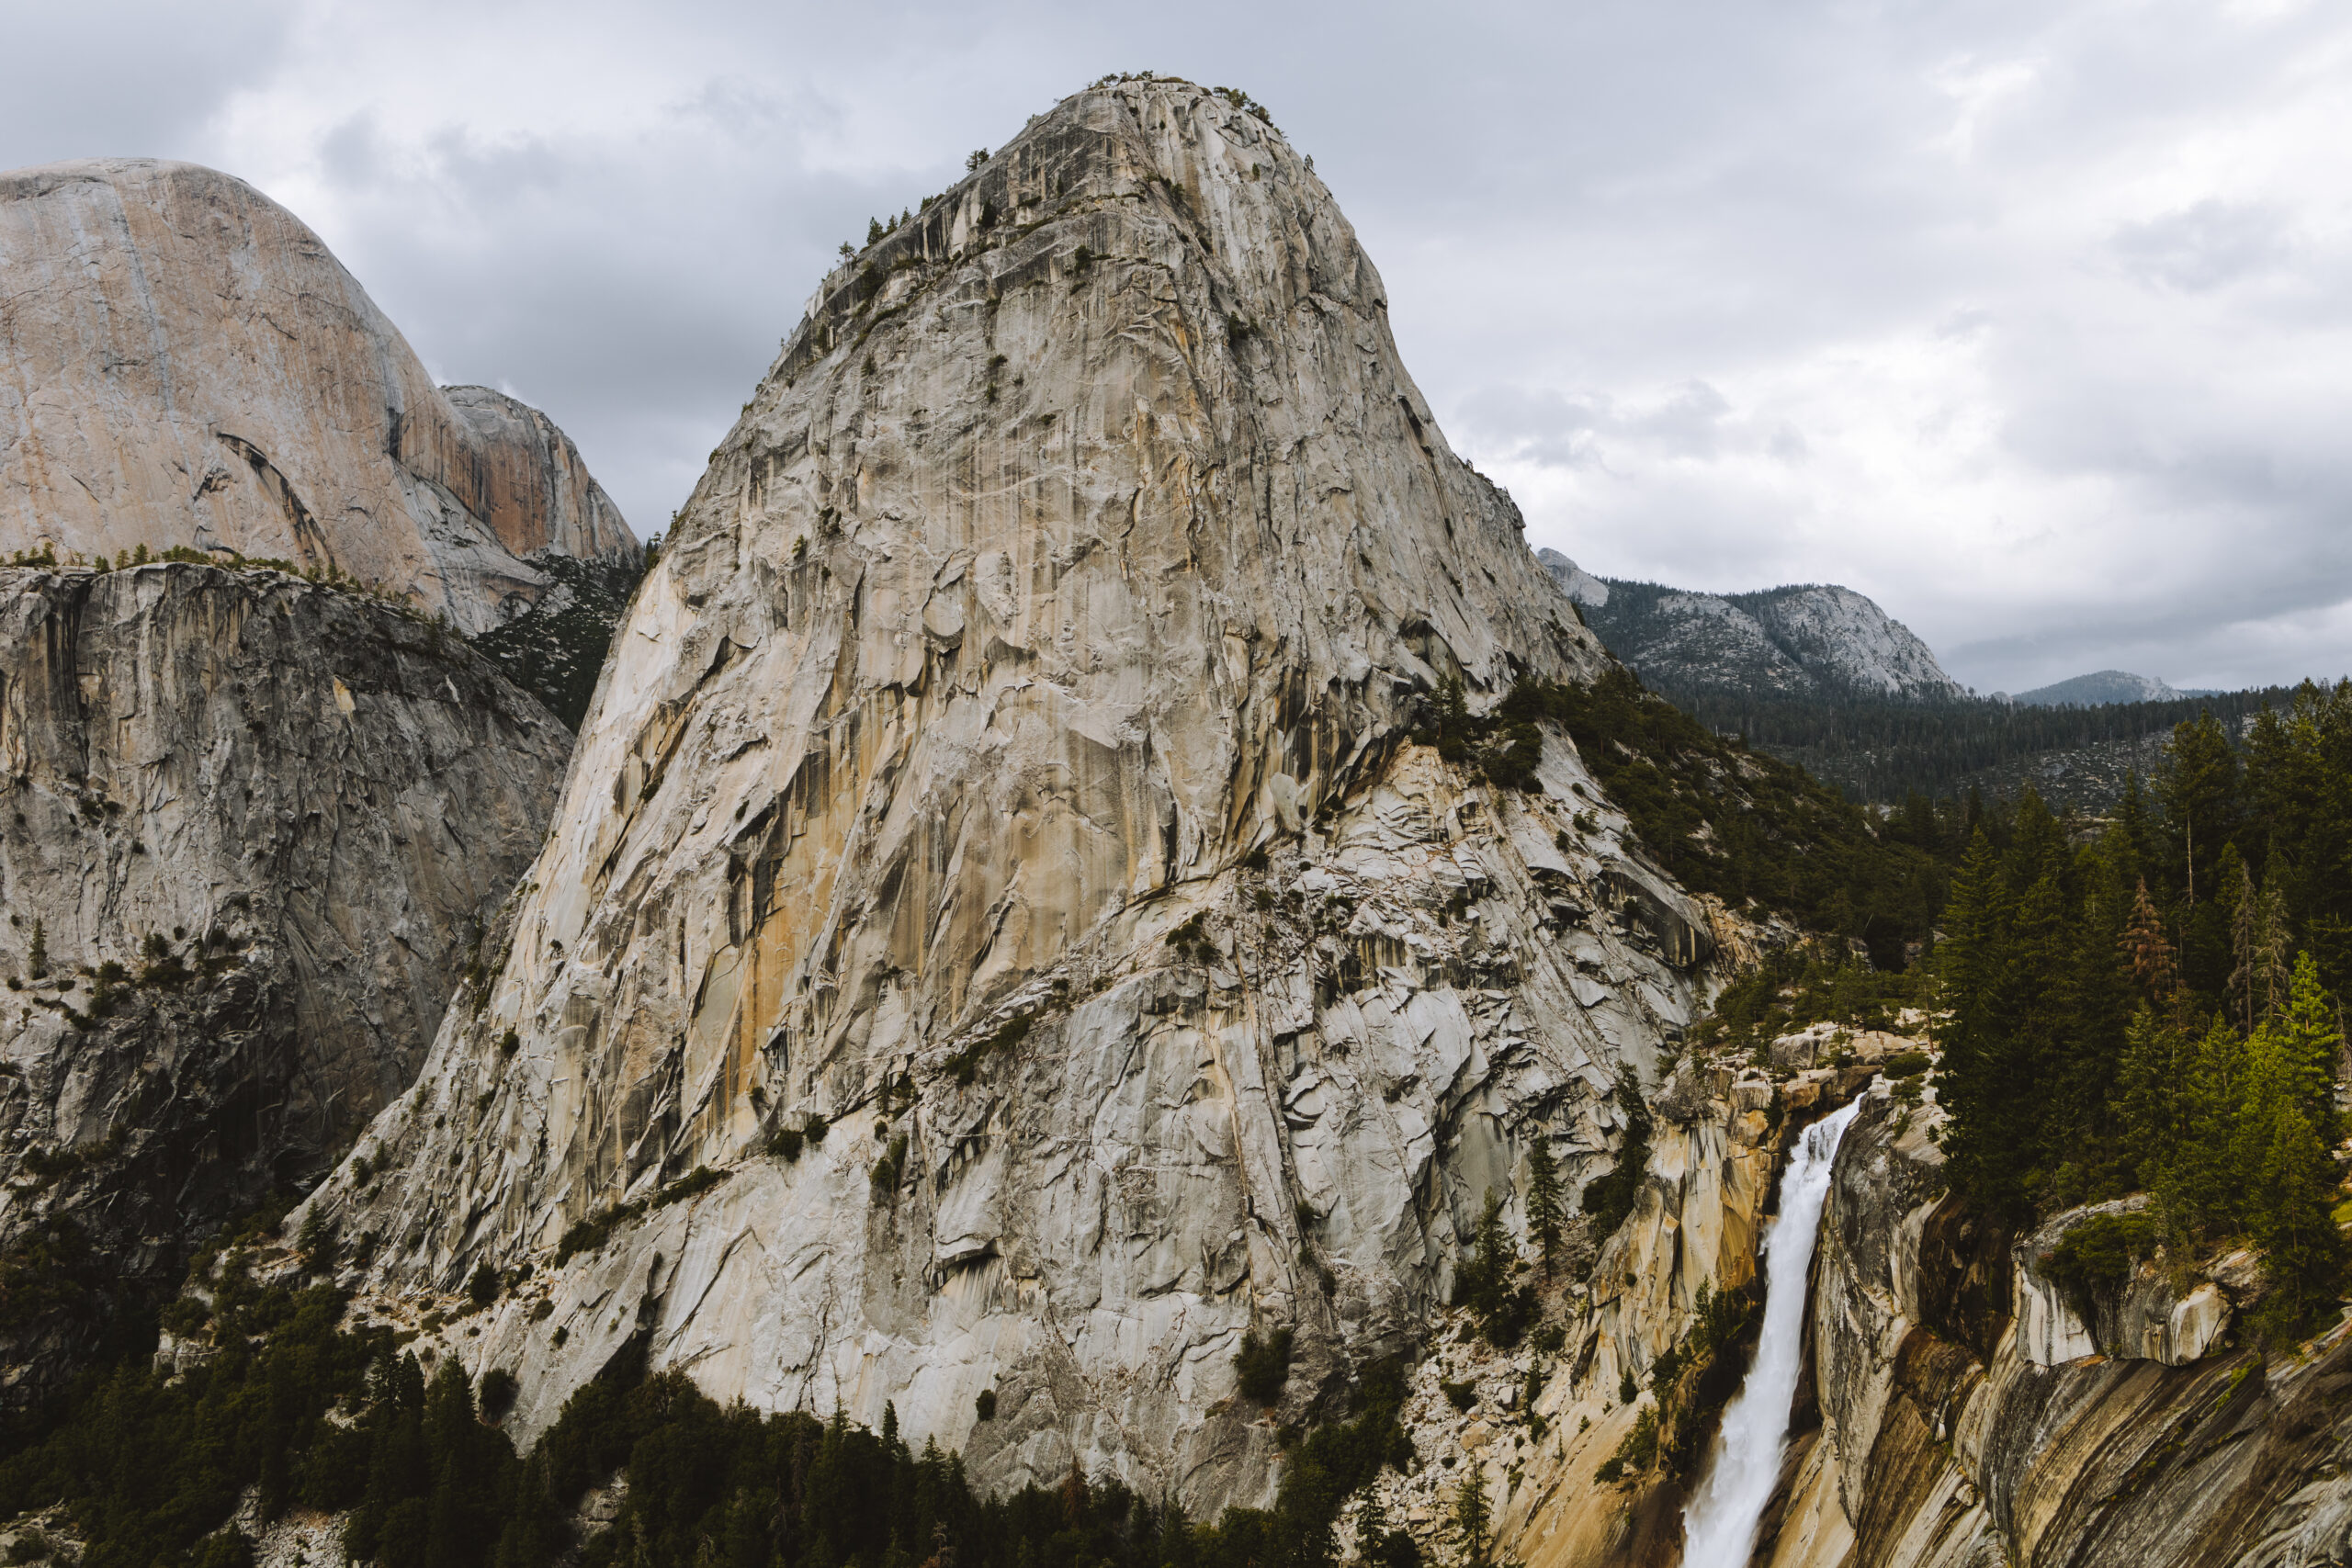
Nevada Fall

The crowd really starts to thin out on the way up to Nevada Falls.
It’s probably because it’s a hard hike. Like, really hard.
We’ve been on some tough hikes. The toughest (for us) was Mount Storm King at Olympic National Park, but this one might have topped it.
It’s tough because it’s rocky, uphill, and quite long (7 miles round trip).
It feels desperate when you round the corner only to see more rocks, stairs, or paths.
And it’s challenging because just when you think you’re at the top, there’s just one more set of stairs.
But – and this is the most important lesson here – it’s worth it because not everyone goes that far.
Like I said, the crowds thin out at Vernal Falls. Nothing wrong with that, of course. Don’t go past your limit.
But if you are able, getting to the top of the roaring Nevada Falls is unlike anything else in Yosemite.
You can stand within a few yards of the falls and peer down into the valley from the top.
You can stand right on the edge and get that vertigo feeling that is equally terrifying and mesmerizing.
We will remember Nevada Falls for a long time:
- Clark Point with the wide view of the falls and granite domes behind it.
- Rusty-looking signs pointing us toward the trail.
- The decline back to the trailhead when our feet and knees were in pain.
- That achy feeling sitting on the shuttle back to the valley.
And we’ll remember climbing up to Glacier Point (more on that later) where we could see the teeny-tiny Nevada Falls from a distance and saying,
“We did that – we really did that!”
Yosemite Valley & Lower Yosemite Falls (12-1:30pm-ish)
The next part of your one day itinerary is to stop for lunch! You deserve it (and need it) after a really, really long hike!
Lunch in Yosemite Valley: Curry Village (or bring your own food!)
Once you get back from the Mist Trail, I think you’ll be craving something savory.
There’s nothing we have found more satisfying after a long hike than a burger or pizza or FRIES.
Yum!!
If you’re looking for food, we stopped at Curry Village (stop 19 on the shuttle).
Curry Village has loads of food options. There’s tacos, pizzas, drinks, snacks, and almost anything you can think of.
It gets pretty full (at least it did for us). So you just have to mentally decide what you want and stand in line.

Your second option is to pack your own food. A sandwich and chips usually suffice for us.
But if you’re feeling campy, try out a freeze-dried meal from REI (or your local campstore). Some of our favorites include: Mountain House Buffalo Style Mac-N-Cheese or Backpacker’s Pantry Cuban Coconut Black Beans and Rice.
There are plenty of places to plop, rest your feet, and enjoy a very satisfying lunch after a long hike.
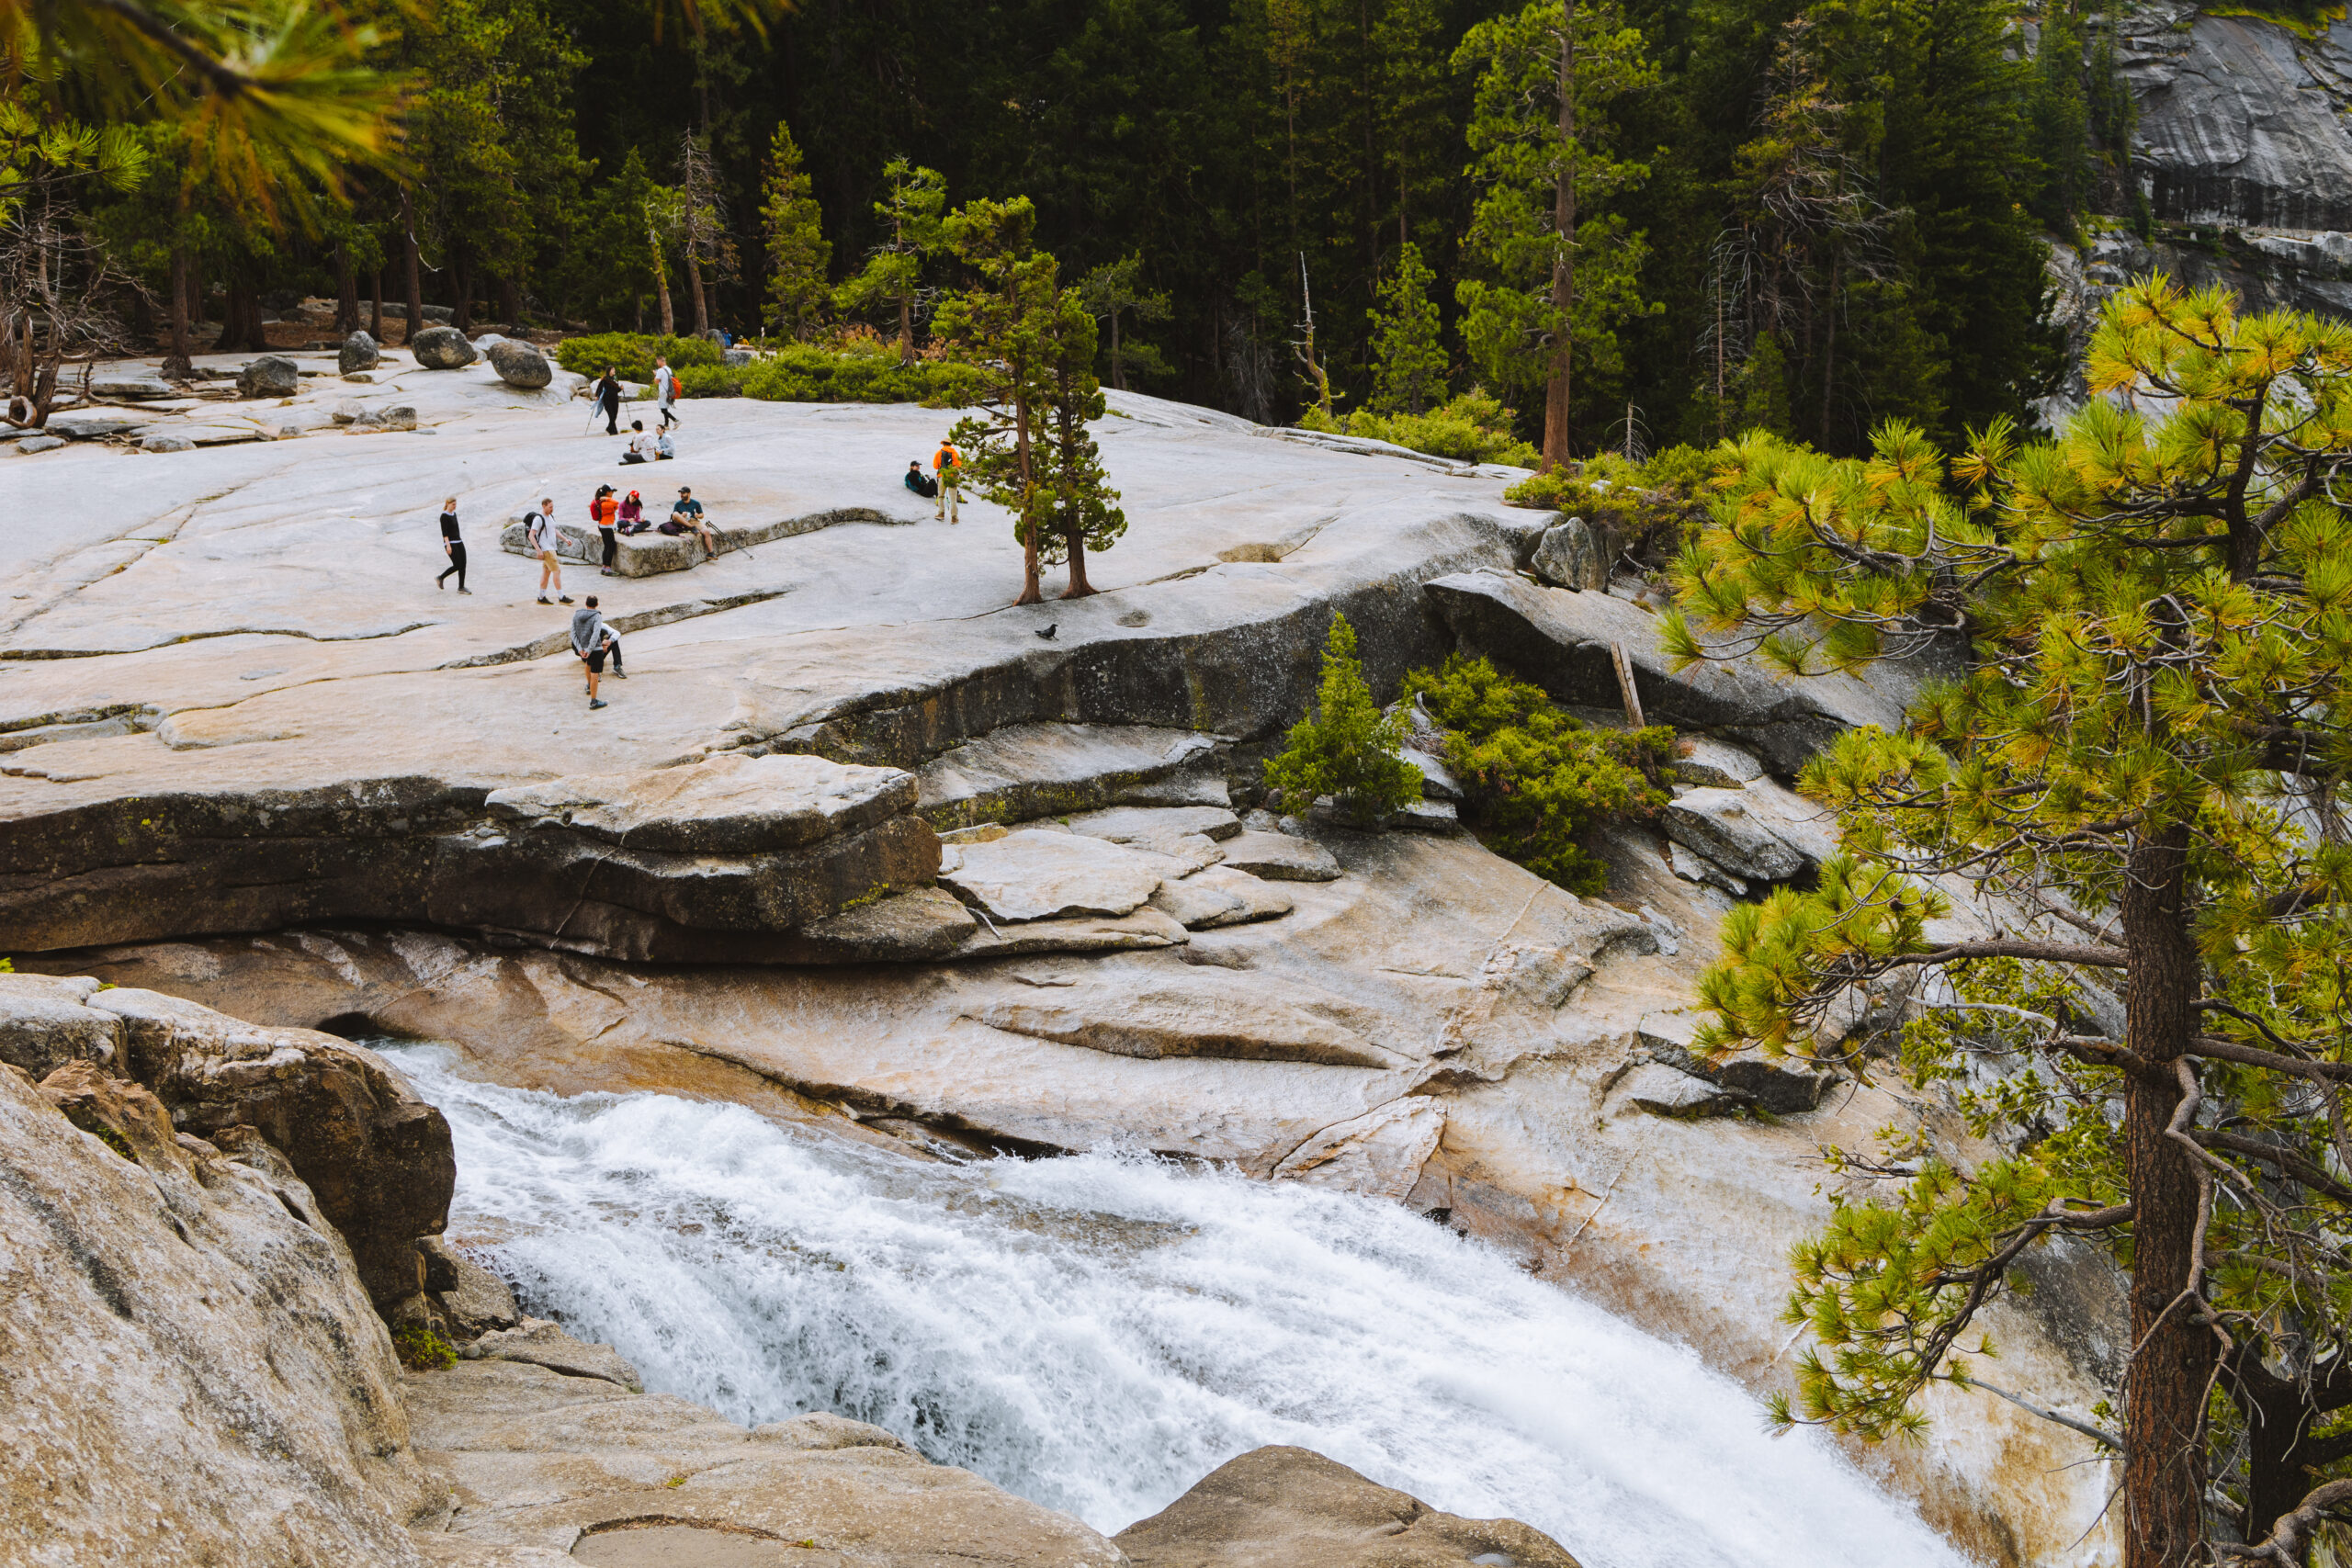
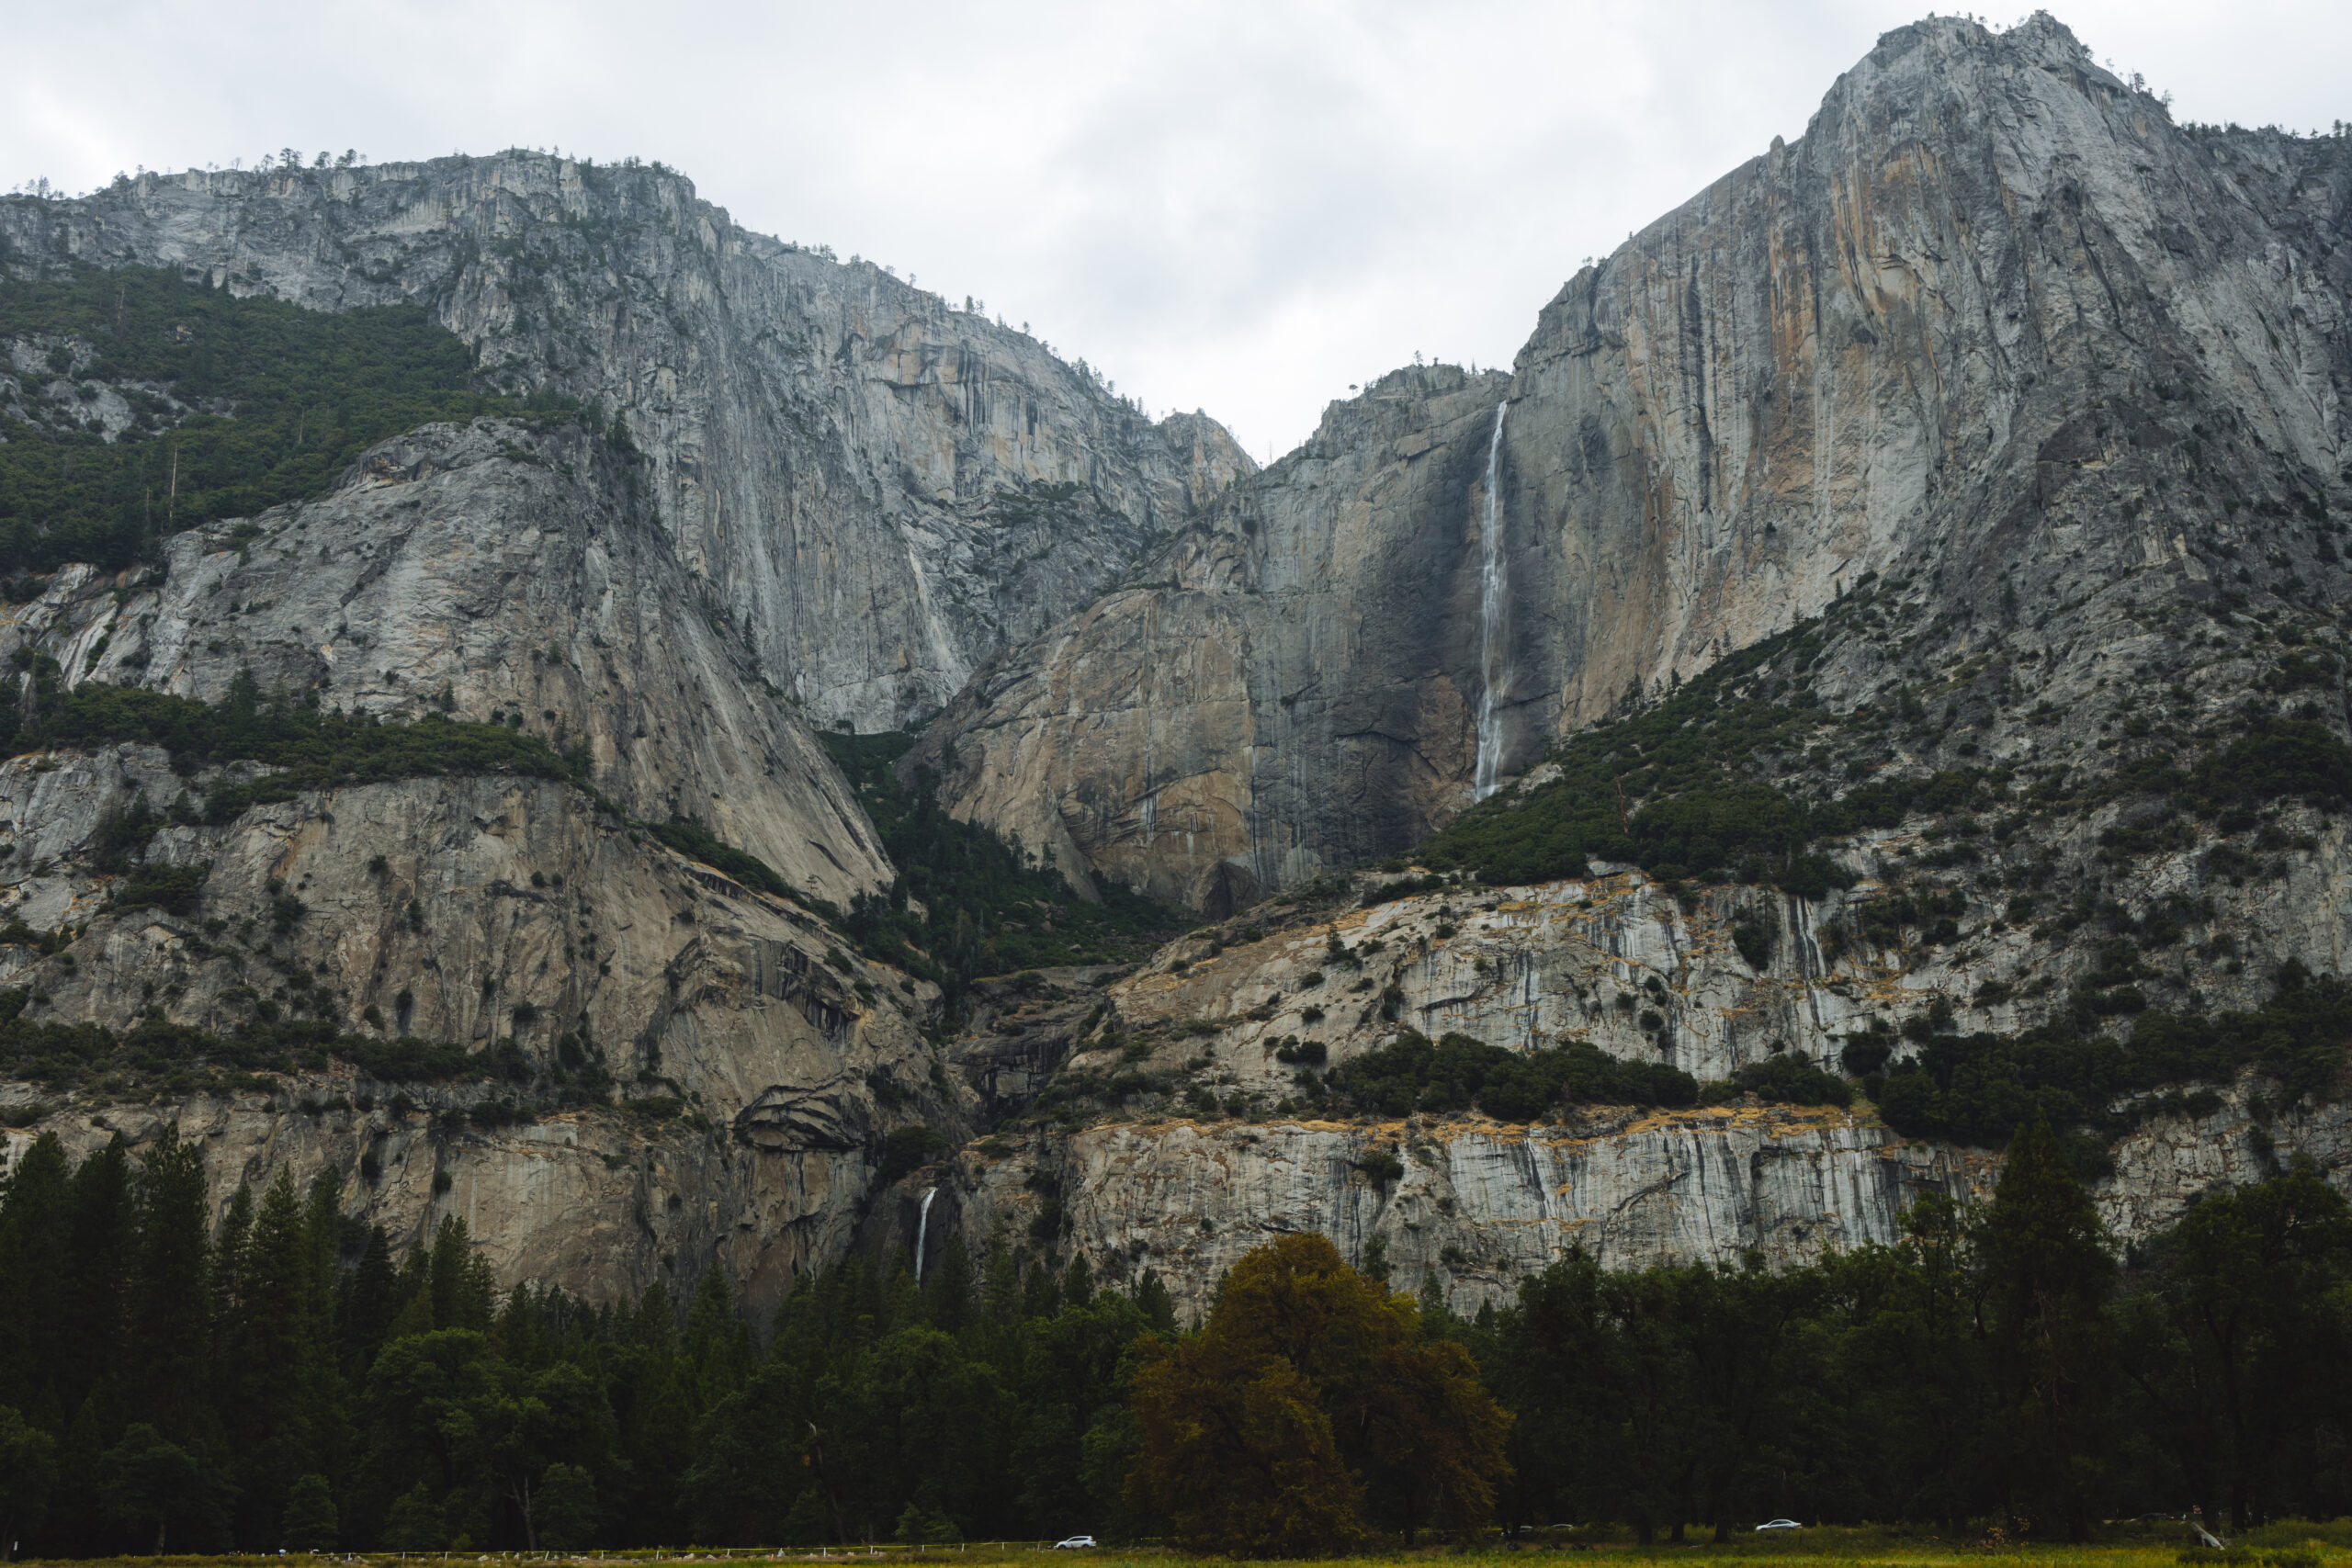
Explore Lower Yosemite Falls
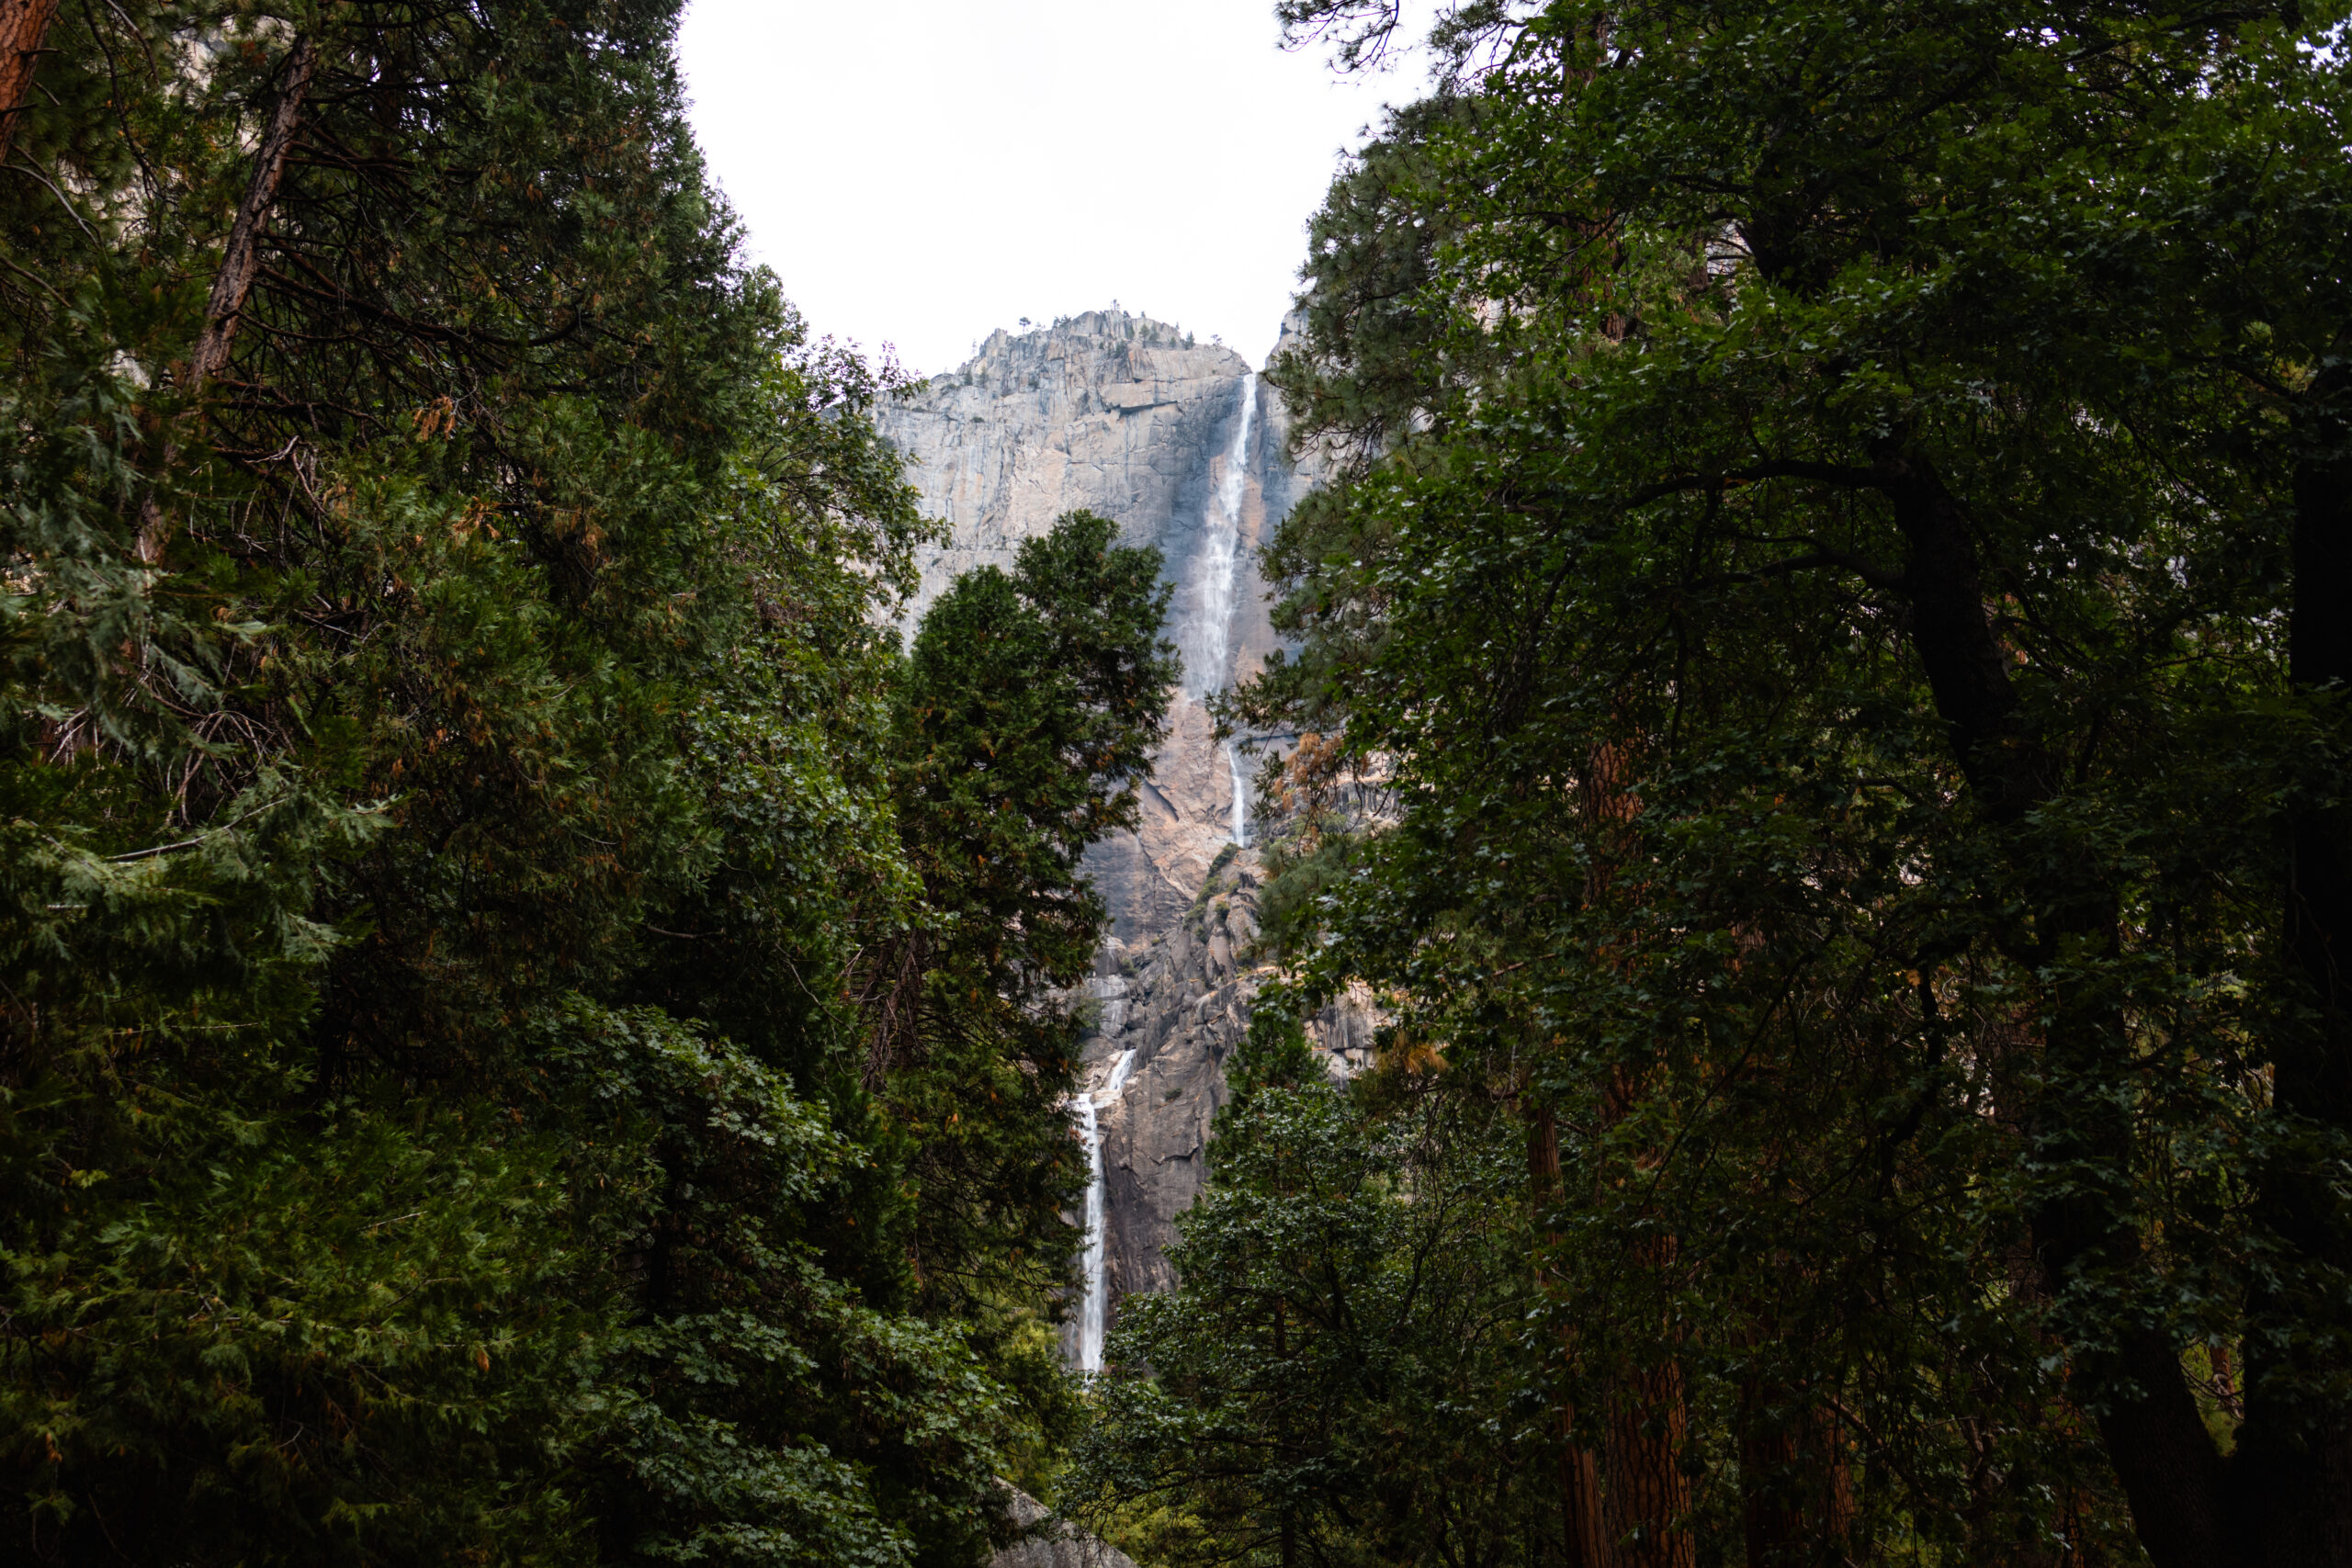
An easy (and short) walk to complete your time in Yosemite Valley is Lower Yosemite Falls.
The Lower Yosemite Falls trail is an easy 1-mile loop. It’s located off Shuttle Stop 6.
Take the path clockwise as it gives you a straight on view of the falls (A park ranger gave us this advice and they were spot on!)
Along the way there are multiple sign posts to learn about the history of the park and places to sit to marvel at the view.
It’s one of the most popular short trails in the park because it’s relatively flat and easy to access.
We saw lots of kids and elderly folks here. Super cool to see folks of all ages enjoying a beautiful location.
If you have time, explore the Yosemite Valley Visitor Center, which is just a stop away at Shuttle Stop 7. Here you can grab a keepsake, more snacks, chat with a ranger, and rest your feet (again) before you continue your one day Yosemite itinerary!
Pit Stop: Valley > Grove > Glacier

Your next choice is between the more efficient route or the better experience.
Efficiently: it makes more sense to go from Yosemite Valley to Glacier Point and then to Mariposa Grove.
Better Experience (in our opinion): go to Mariposa Grove (therefore bypassing Glacier Point Road), and then go back up to Glacier Point for late evening and sunset.
If you open up google maps, you’ll see that Glacier Point is in-between the two others.
At the end of the day, you can’t go wrong with either. Do what you want – your trip, your choice.
Our vote: Valley > Grove > Glacier

But you’ll have just as good an experience if you go: Valley > Glacier > Grove
Hope you’re not too confused. Sorry about that!
Mid-Day: Explore Mariposa Grove (1:30-3:30pm)

If you took our advice, you’re headed down to Mariposa Grove (good choice).
Barring any traffic jams, the drive from Yosemite Valley to Mariposa Grove is approximately 1 hour.
The drive itself is quite spectacular. I wouldn’t recommend any pullouts, but the passenger will get some nice views of the surrounding Yosemite Wilderness (driver, pay attention to the road!)
Once you arrive at Mariposa Grove, you’ll be greeted with a big, two-level parking lot. Cross your fingers for an easy time finding a spot to park. Patience is the key.
Park in the lot and take the free shuttle up to the sequoia groves.
Here’s where the fun begins (again!)

Explore the Mariposa Grove of Giant Sequoias
This area has three primary loops:
- Short: Big Trees Loop (0.3 miles)
- Medium: Grizzly Giant Loop (2 miles)
- Long: Guardians Loop and Mariposa Grove Trail (6.5-7 miles)
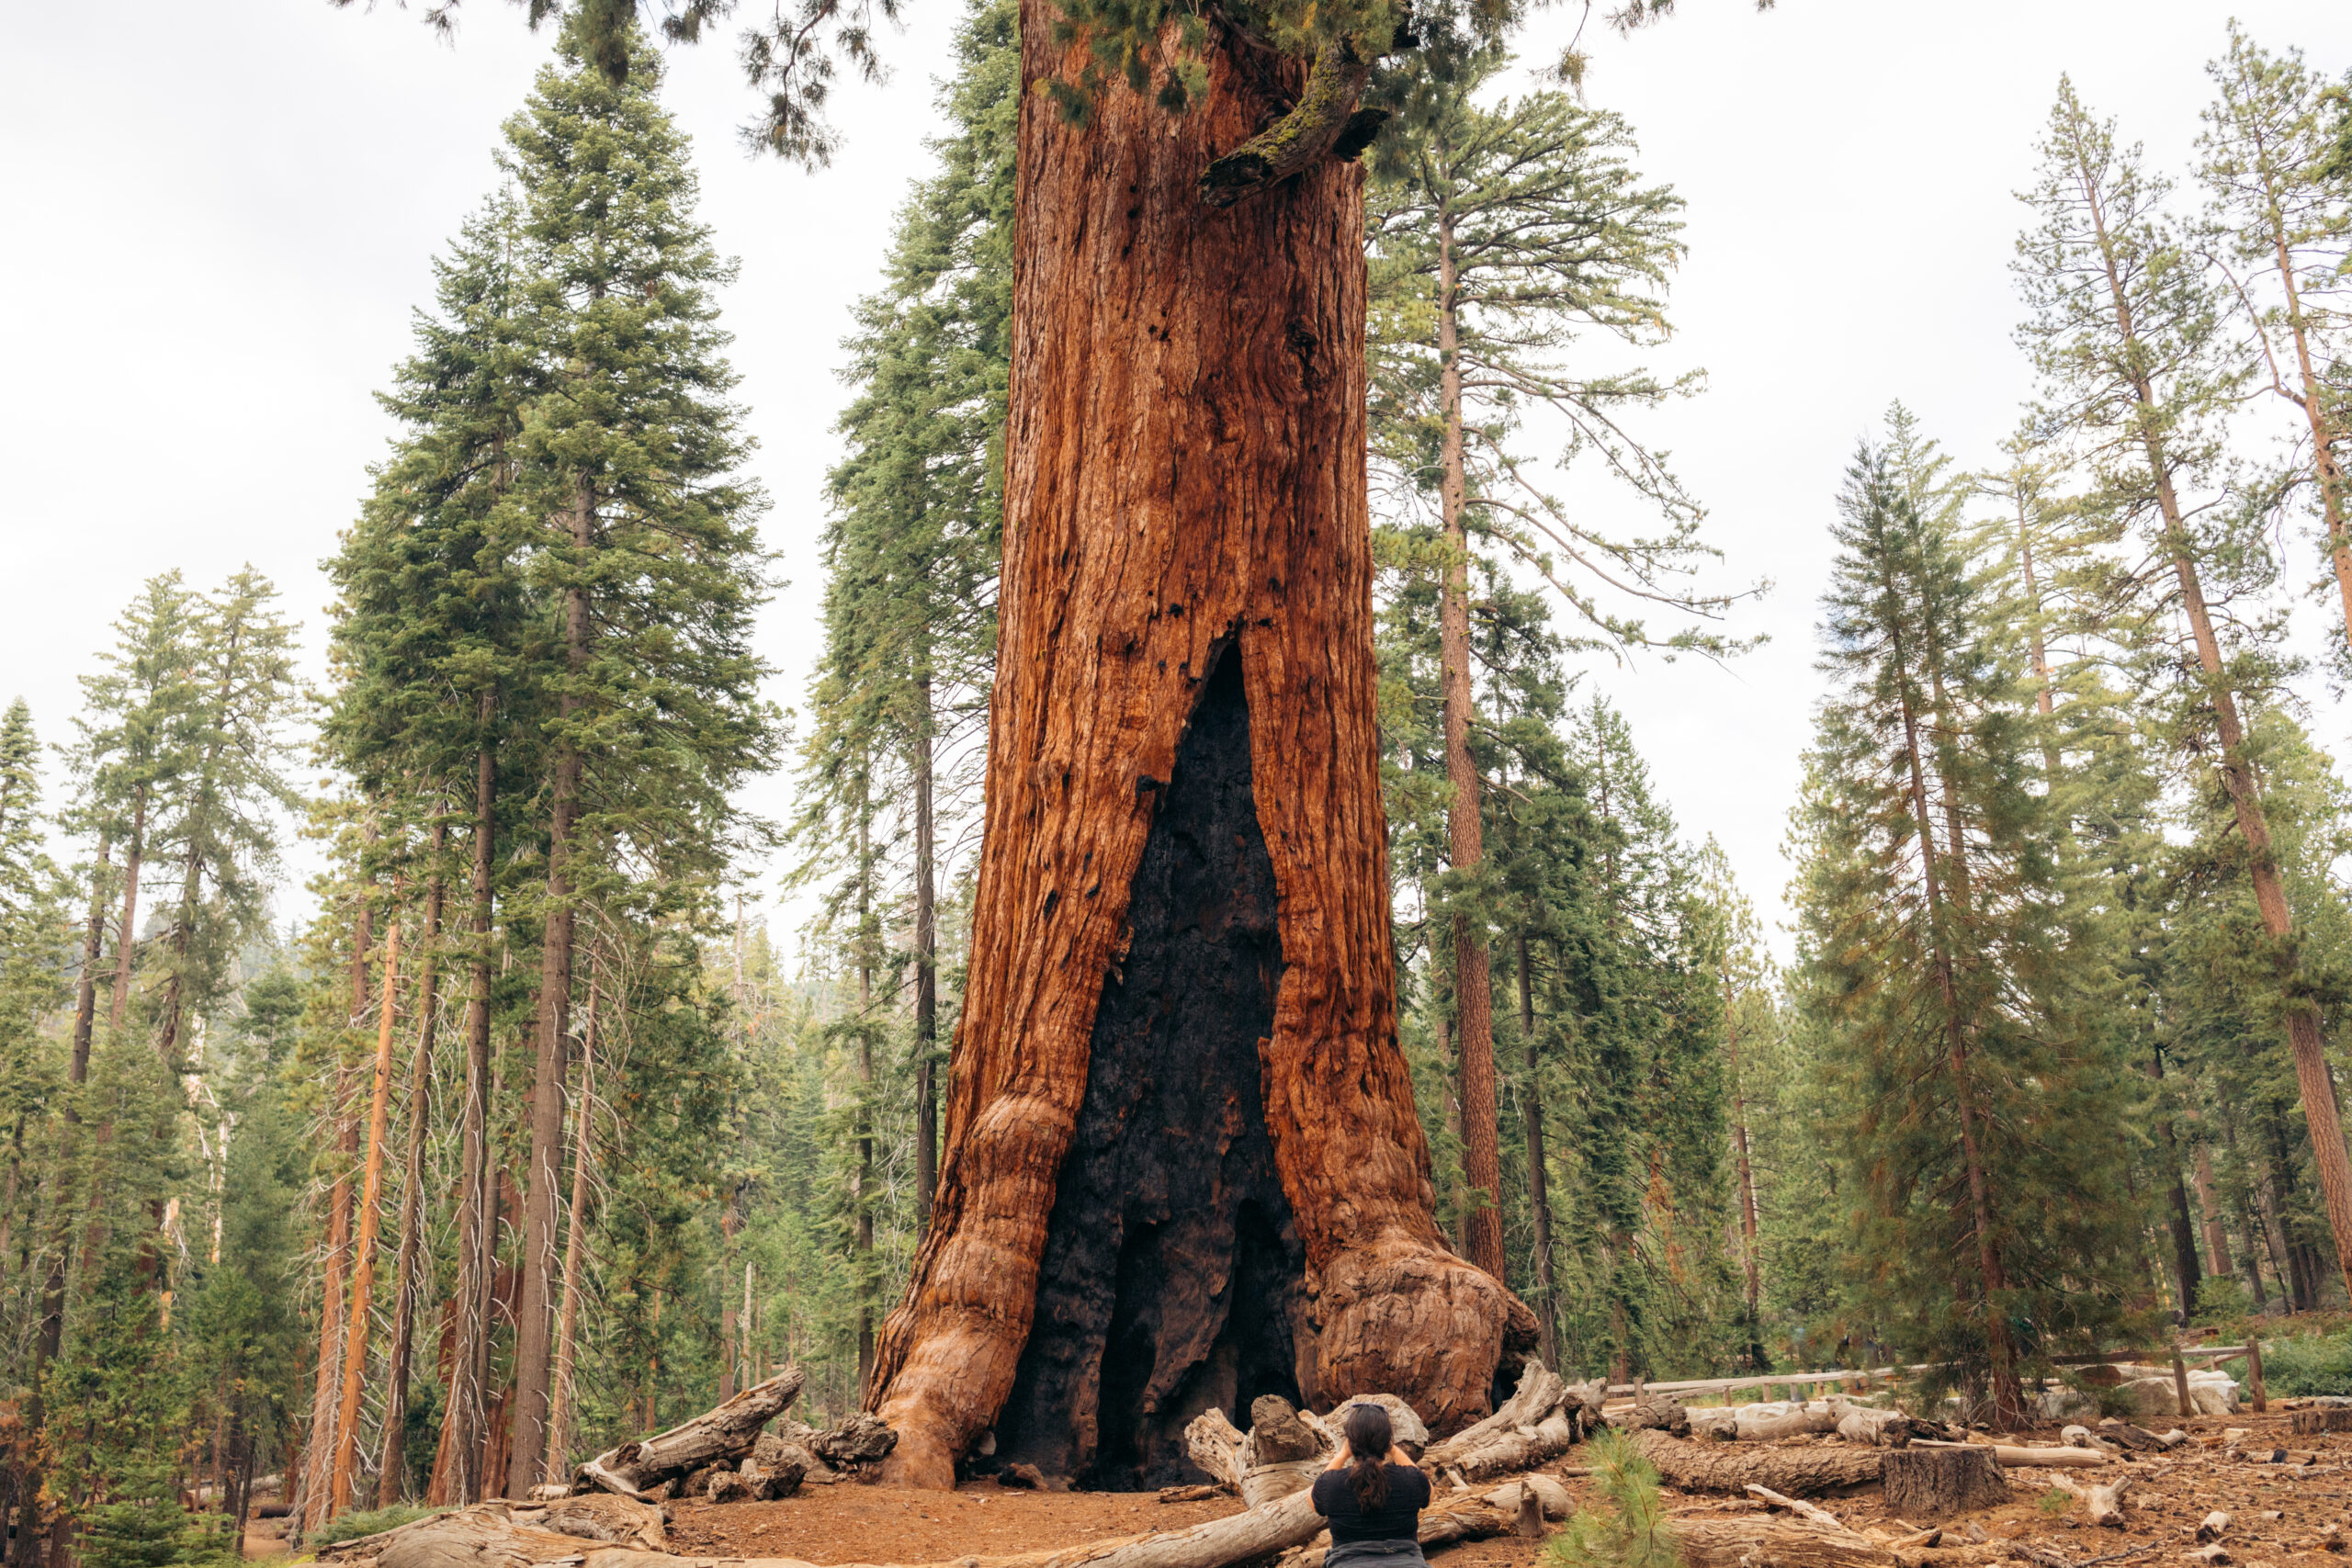
Our choice is to take the Grizzly Giant Loop. It’s arguably the main reason to stop at Mariposa Grove.

Grizzly Giant Loop
Trail Basics:
- 2 miles round trip
- Easy-to-moderate
- 380 feet elevation gain
- Main Attraction: Grizzly Giant Sequoia
- Other Notable Trees: Fallen Monarch, Bachelor and Three Graces
From the elegant trail entrance to the groups of sequoia trees along the way, this hike was lovely.
This trail holds so much history.
It is said that John Muir convinced President Theodore Roosevelt to protect Yosemite on this very trail and under the Grizzly Giant. President Roosevelt was so enthralled by this place that he directed the federal government to protect 228 lands and parks.
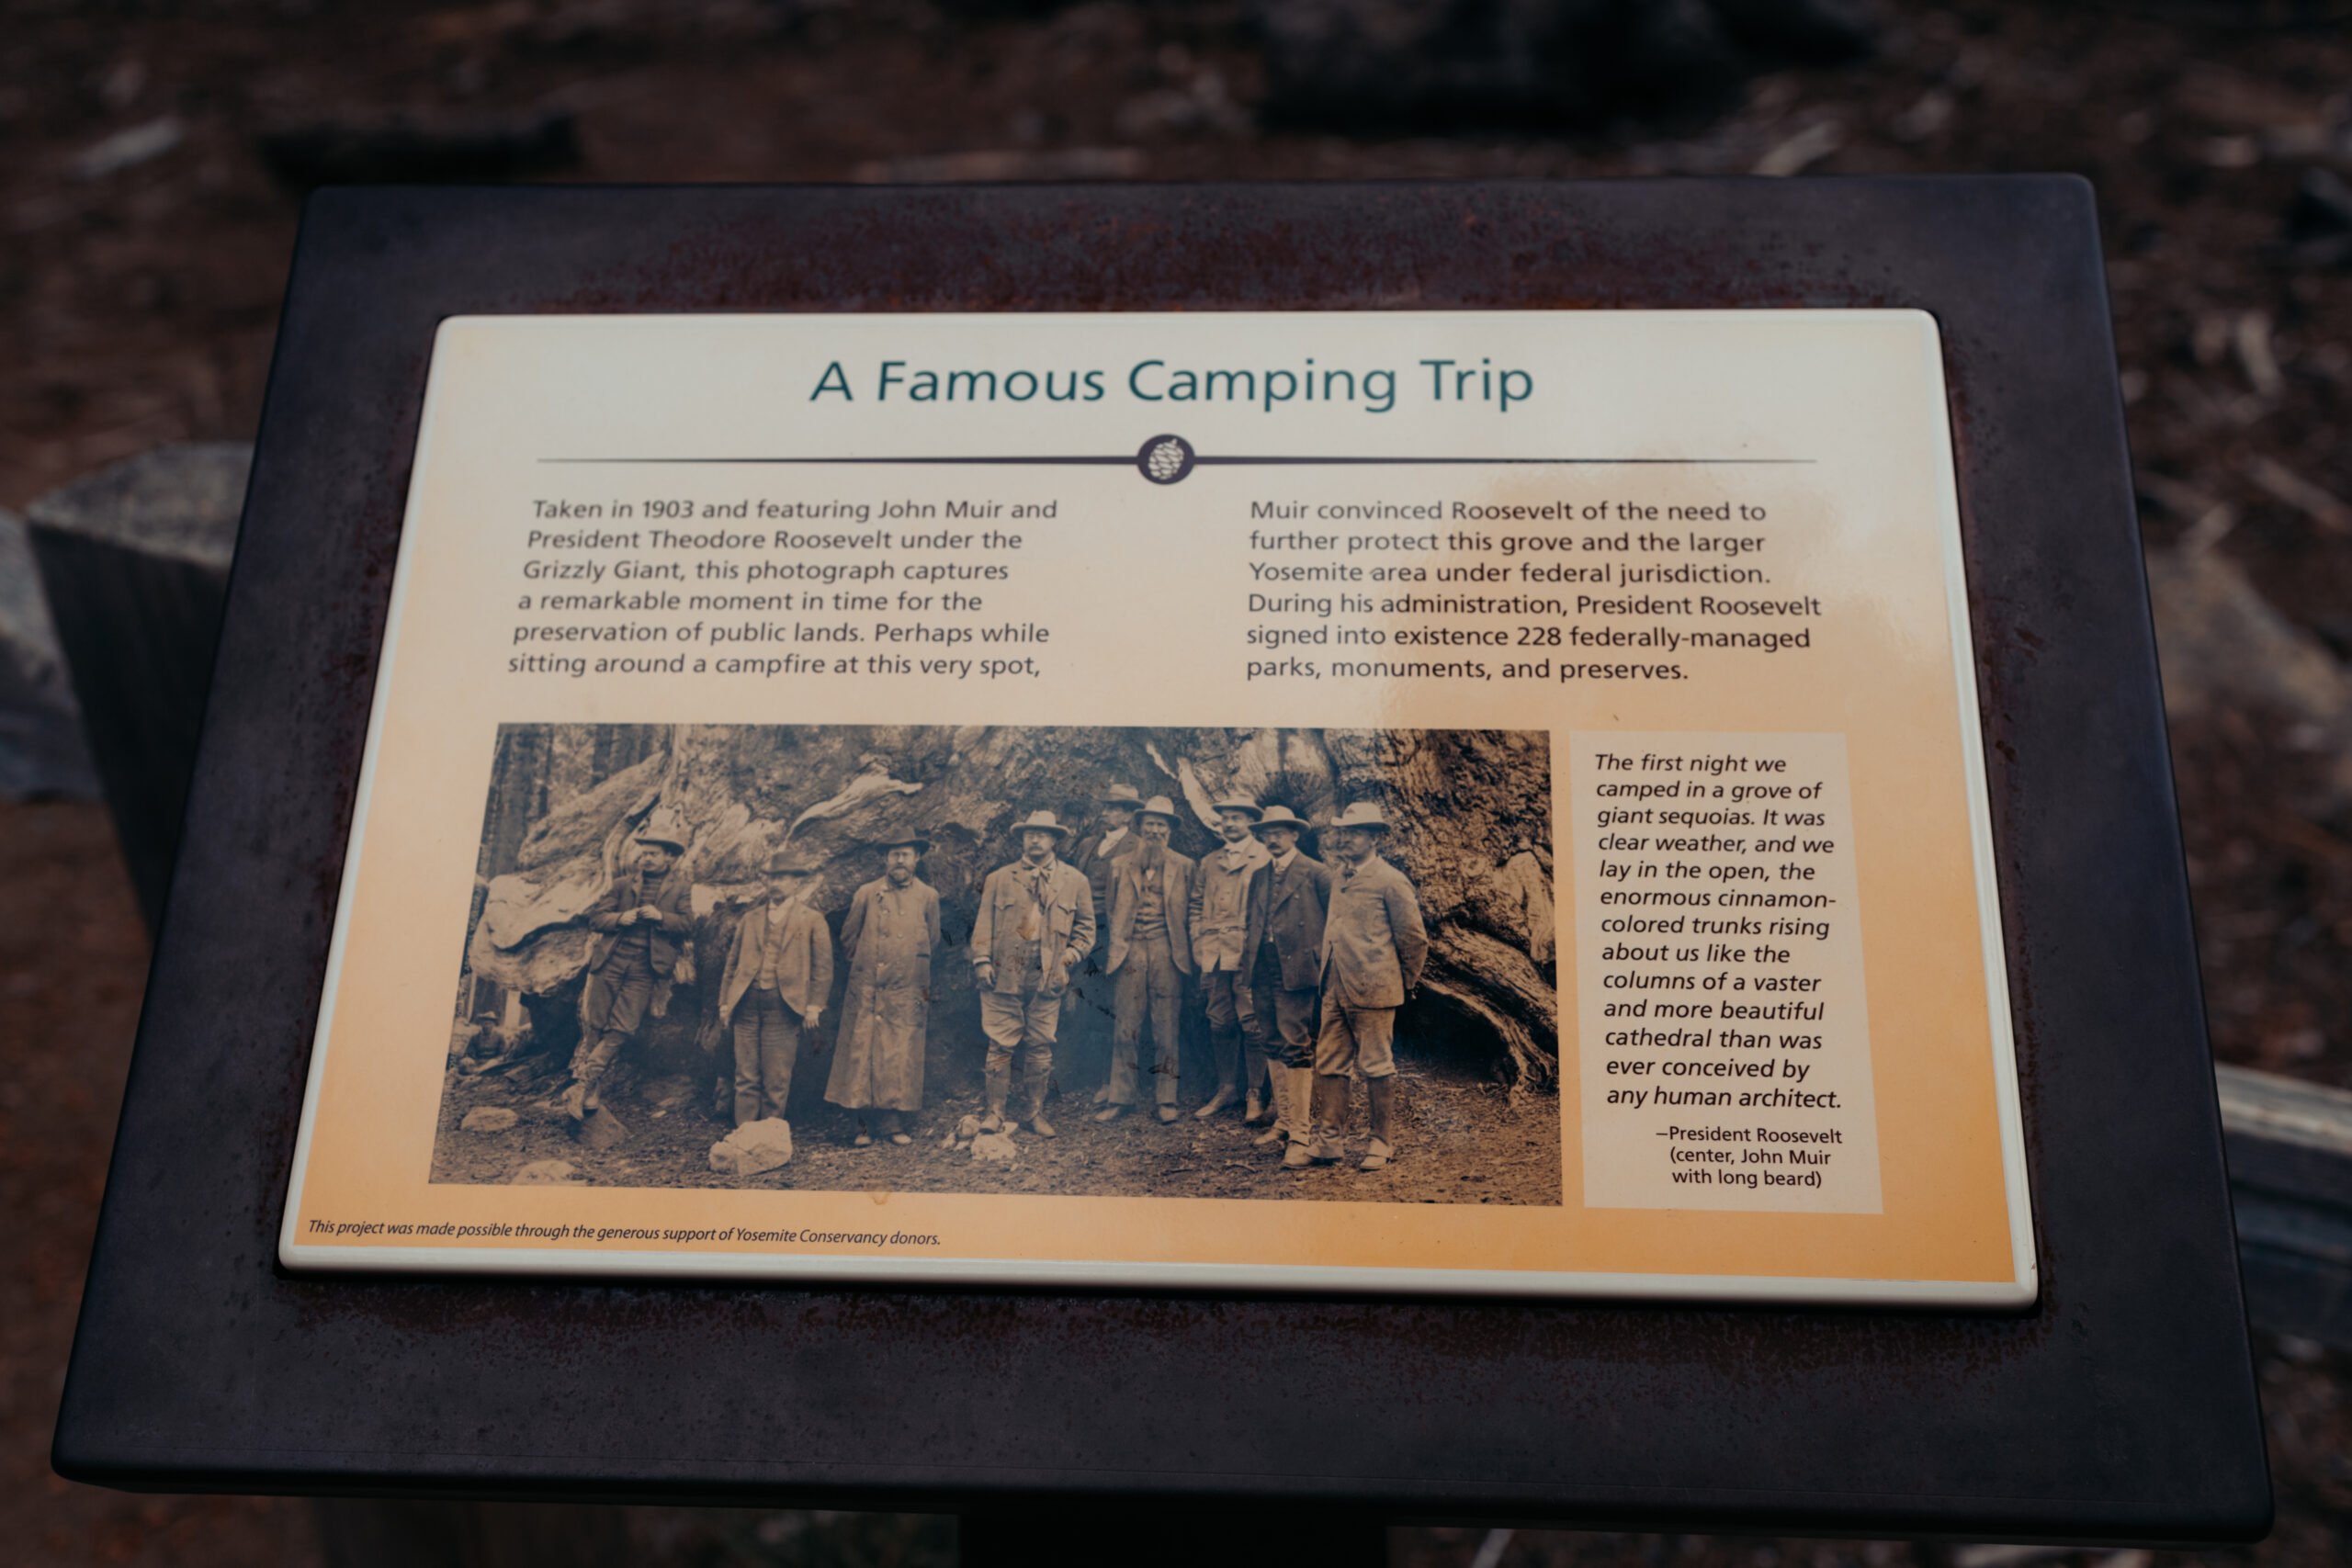
Anyhoo – the jewel of this hike is the Grizzly Giant.
Standing at 209 feet with a volume of 34,005 cubic feet, the Grizzly Giant is the largest and oldest sequoia tree in Yosemite National Park.
It is the 26th largest sequoia tree in the world and was once considered the oldest tree on earth – it’s approximately 2,995 years.
Here’s the most important thing I want you to know – just take it all in.
Slow down. Catch your breath. Take your photos.
Then put the camera away.
Meander around the tree. Look at the way the branches twist and turn upward. Consider how the tree leans just enough for you to wonder whether it’ll tip over right there and then.
Read the signs. Don’t be rushed to move on to the next thing quite yet.
If you’ve never seen a sequoia tree in your life, you’ll be amazed.
It’s bigger than you can imagine.
You’ll immediately understand why it’s called the Grizzly Giant.
And as I sit here in this cafe writing about this experience, I wish for nothing more than to have slowed down enough to see it with my mind’s eye.
I still can.
But I wish I could see it more clearly.
Linger just a little bit longer. Don’t be embarrassed by other travelers looking to read the signs too. Enjoy it together.
And when you’re ready, let’s move on to the next part of our trip.

Late Afternoon: Taft Point & Glacier Point (3:30-7pm)
Your final task is to make your way up to Glacier Point.
From Mariposa Grove to Glacier Point is approximately another hour.
Just follow the signs and you’ll find it quite easily, but just in case, here’s a google maps pin to the entrance of Glacier point road.
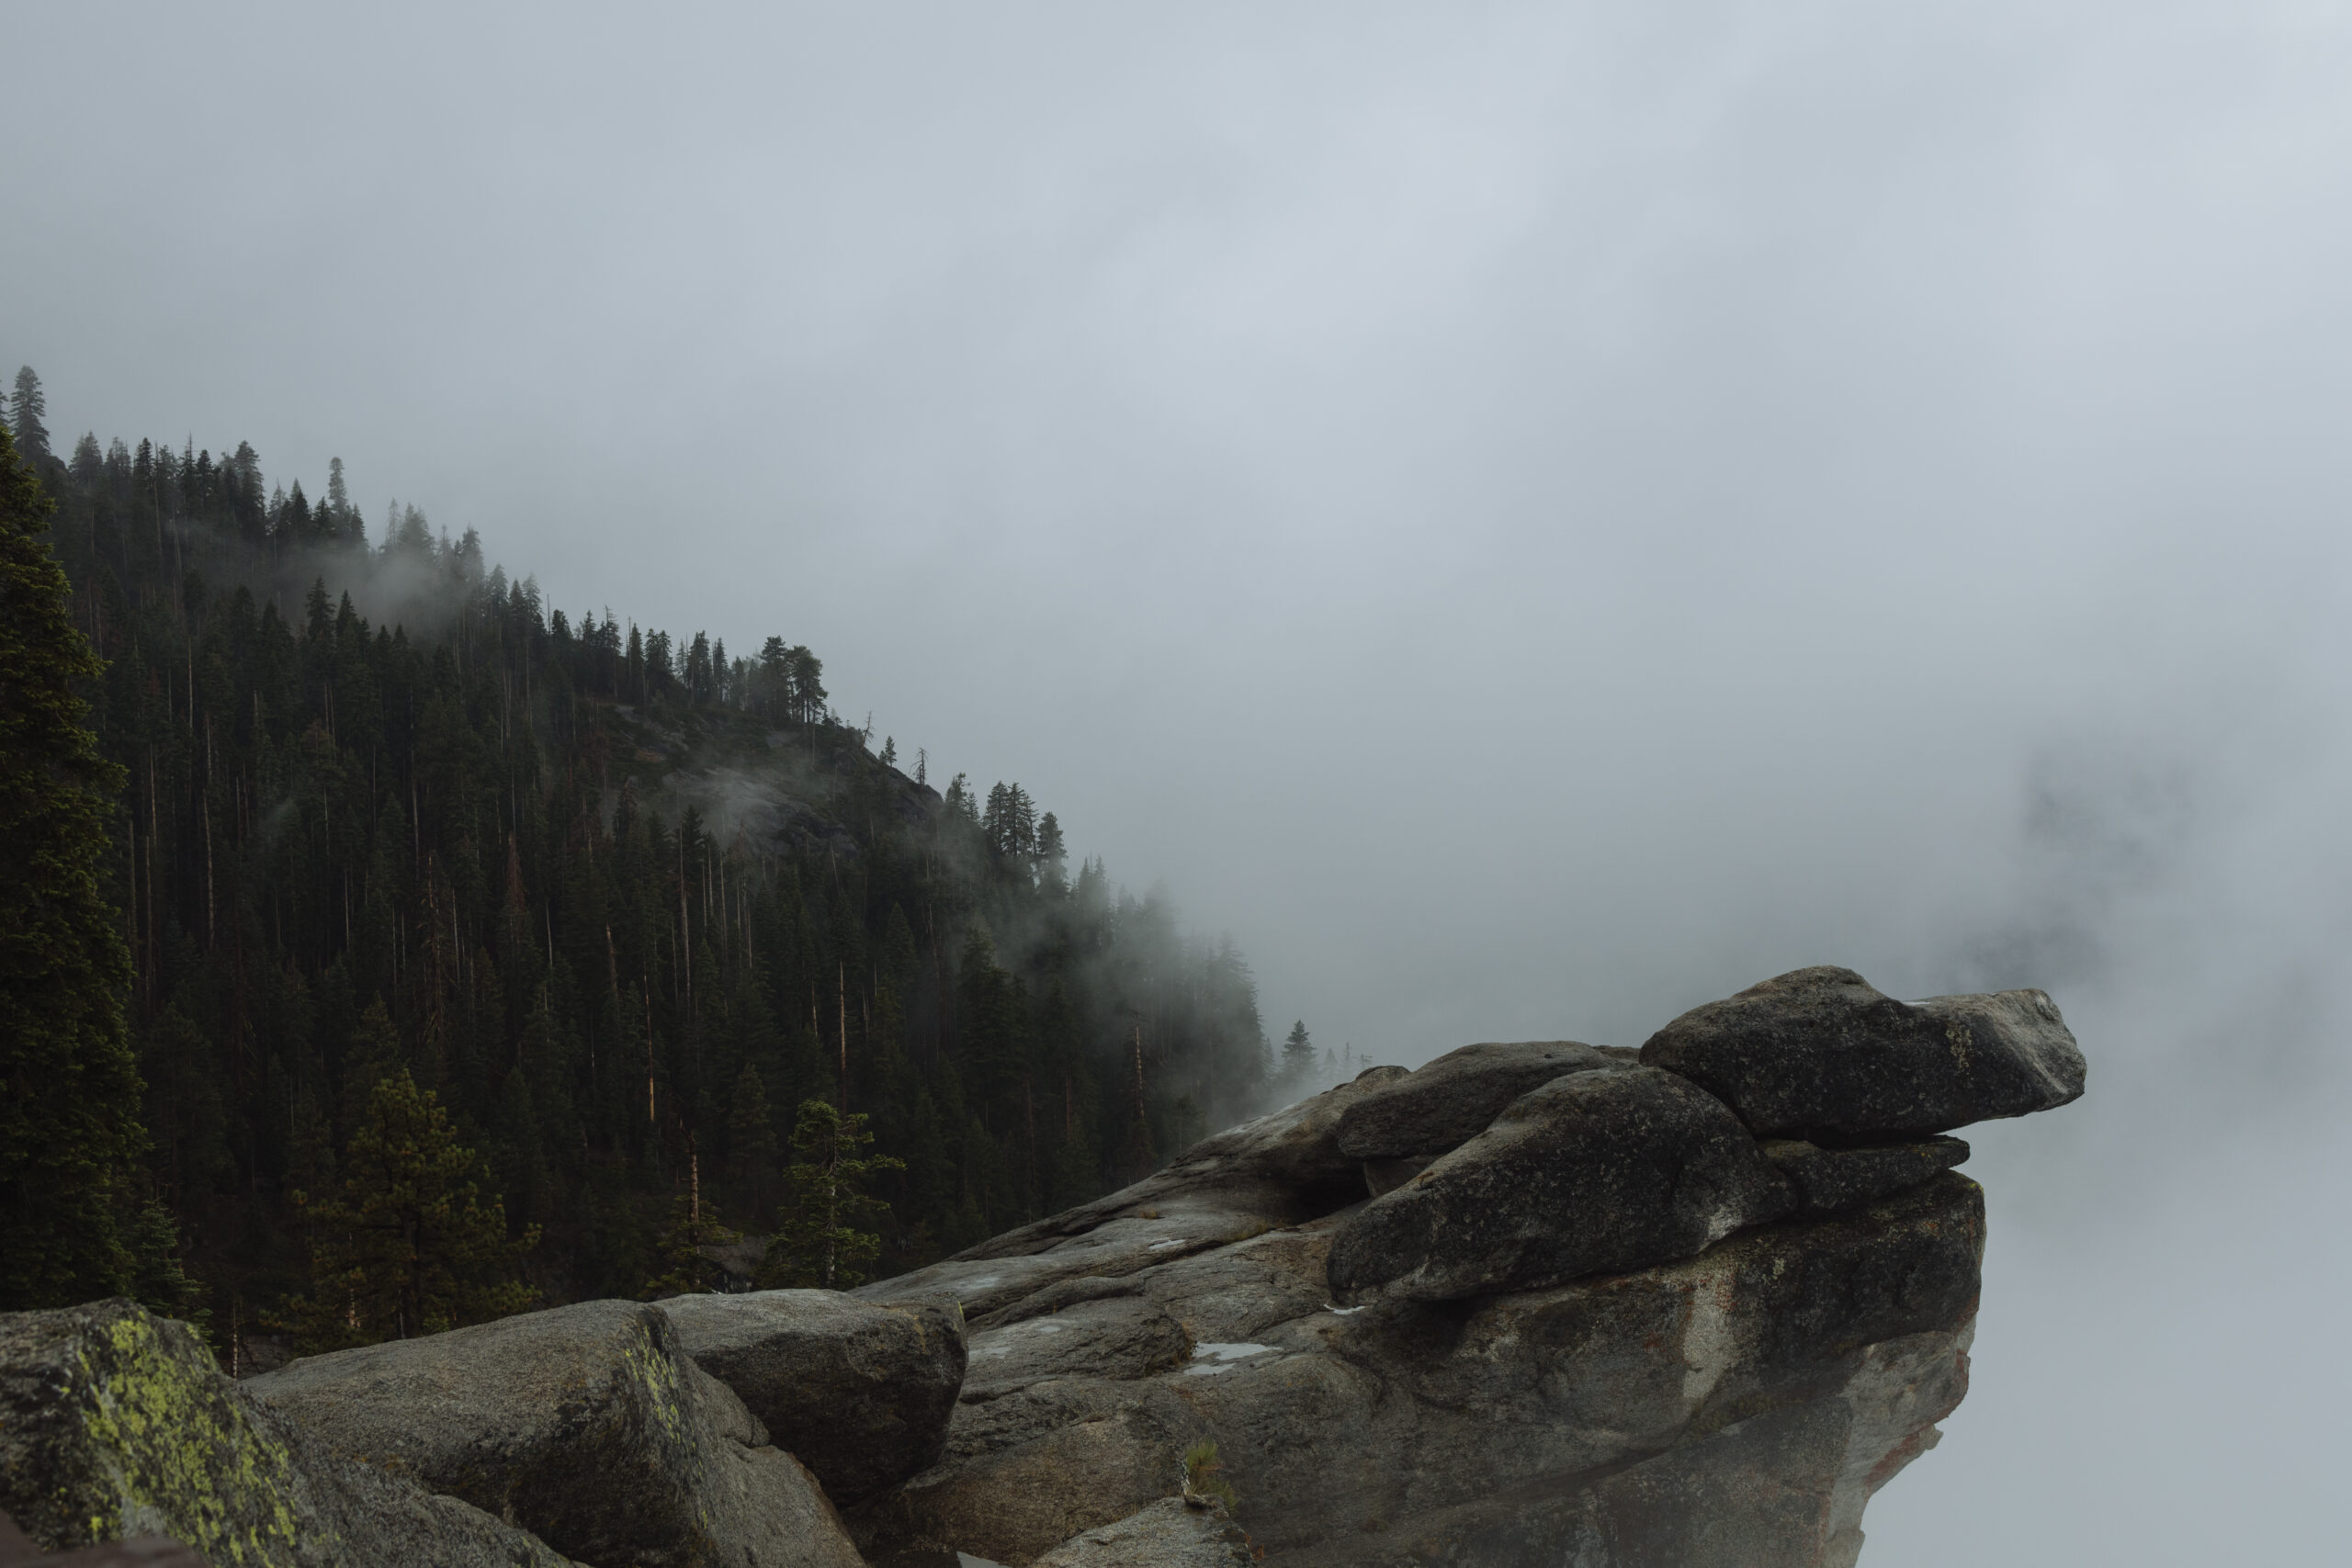
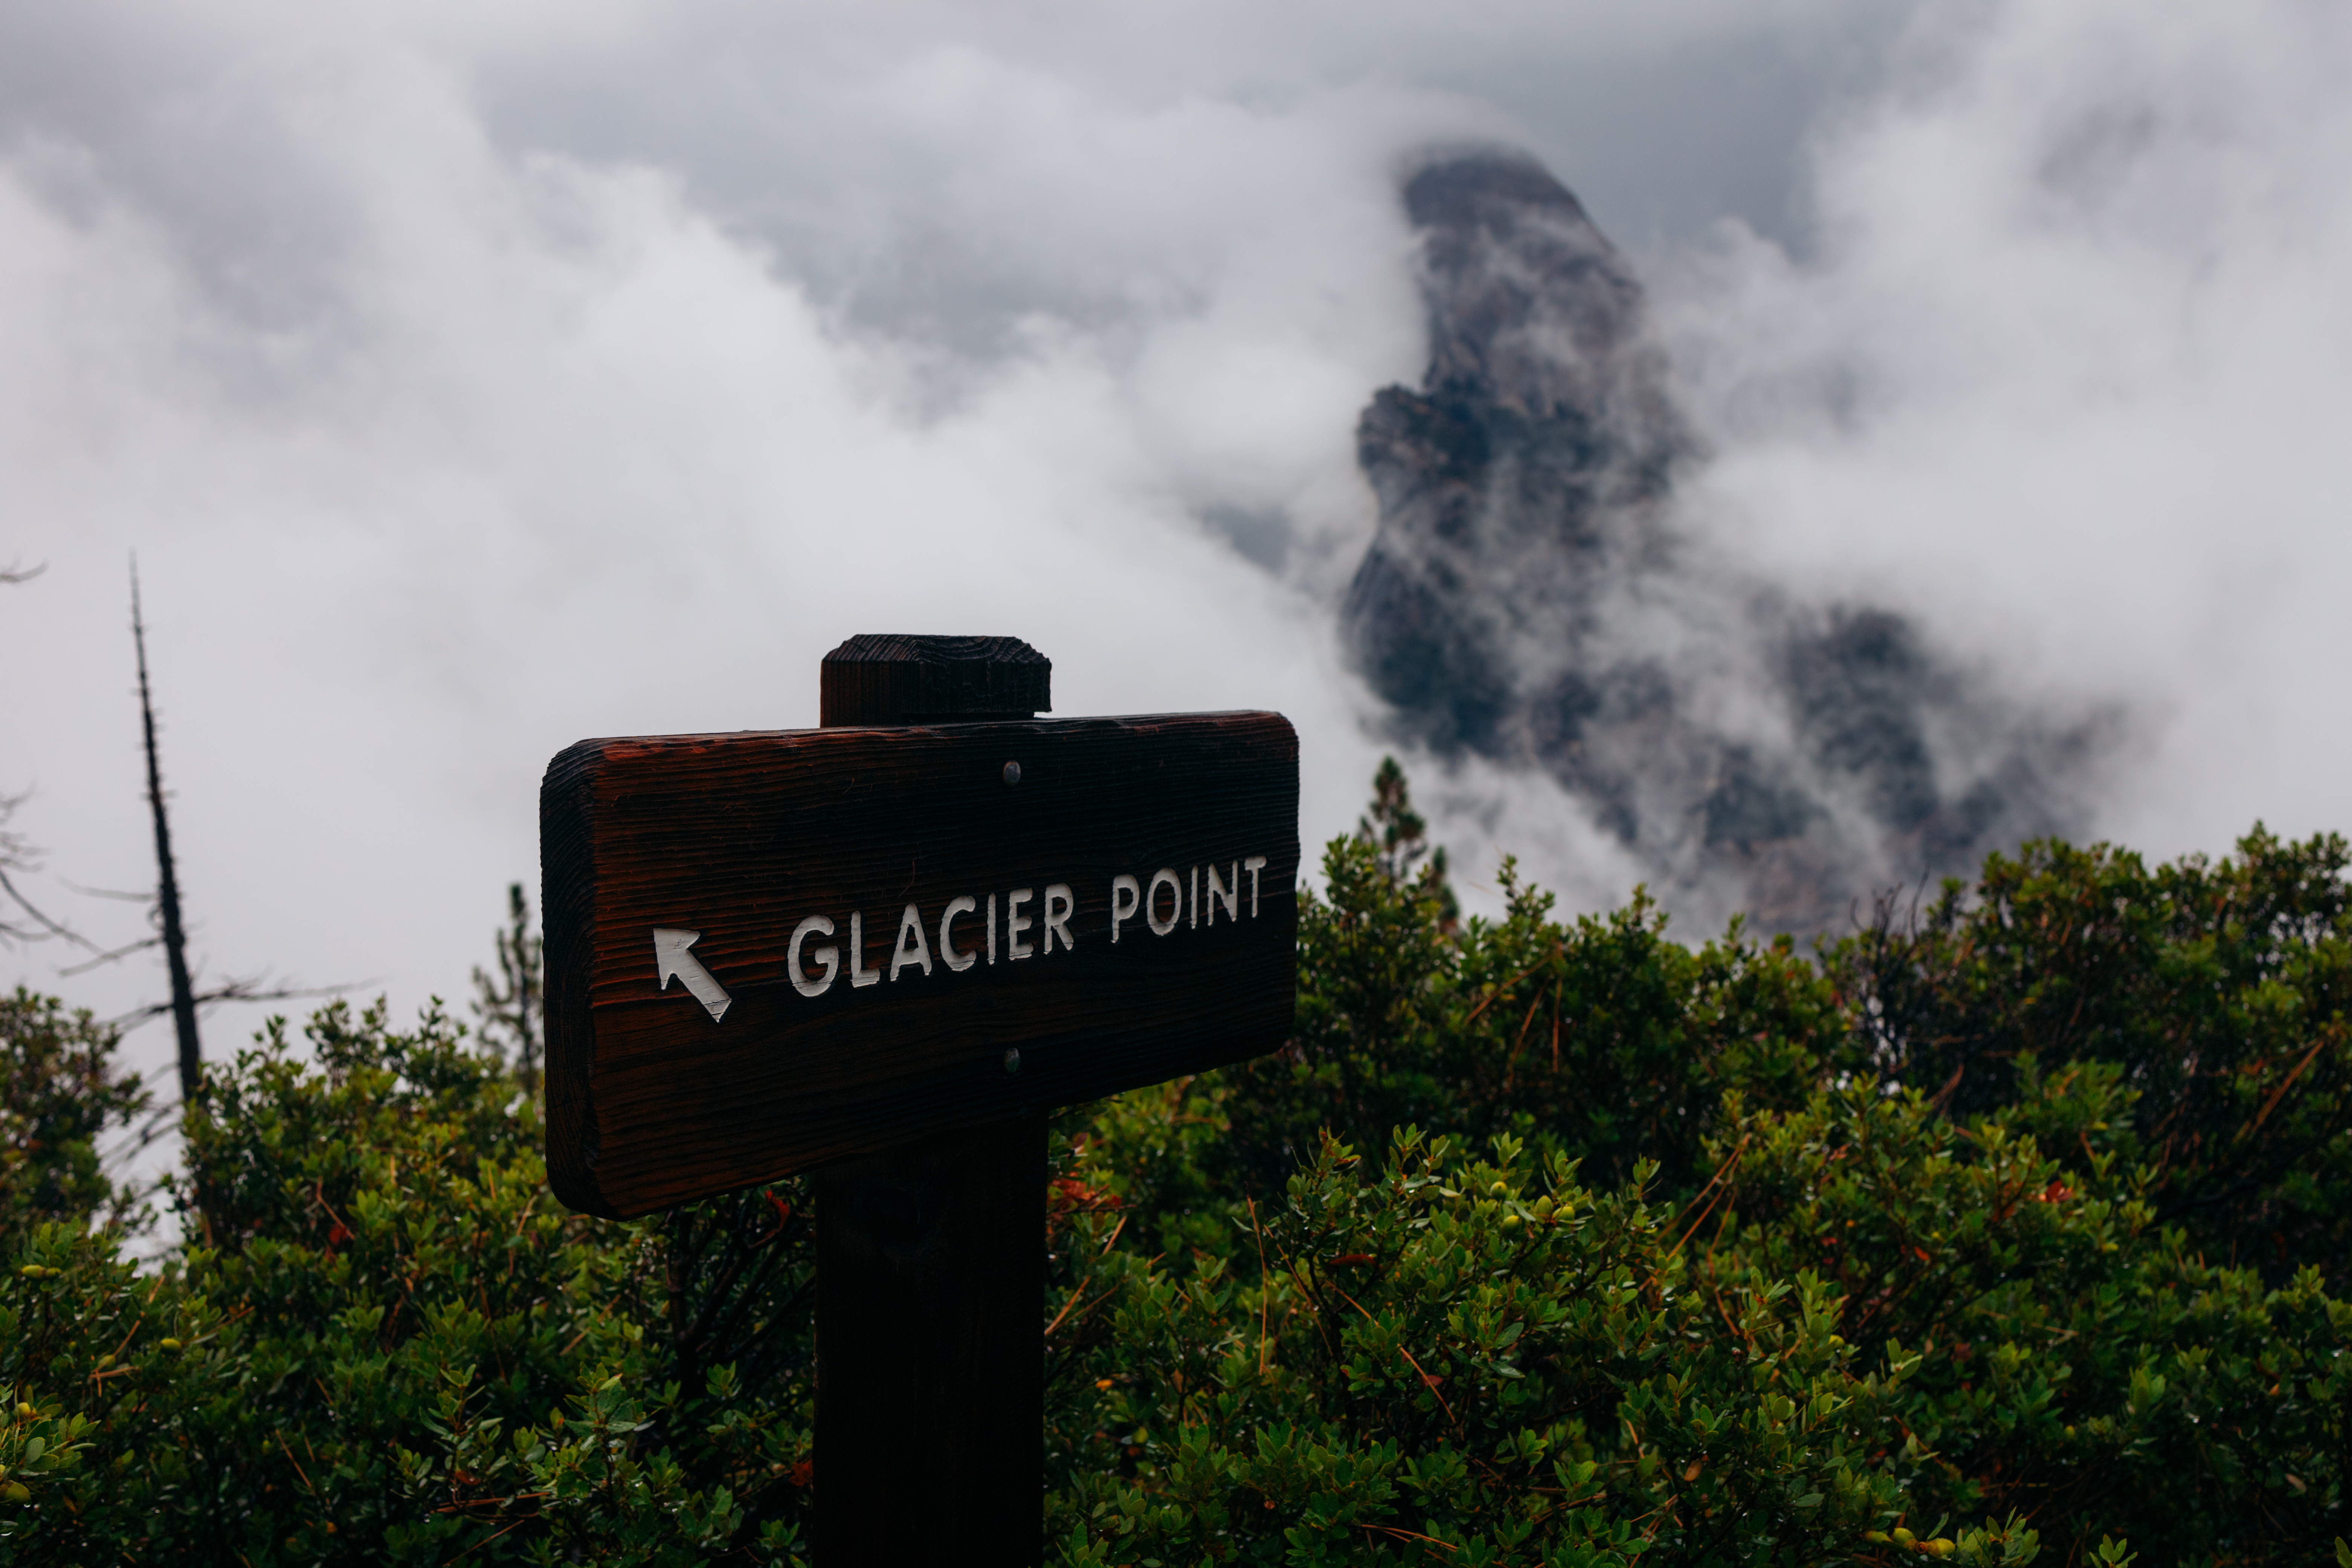
Your first stop to the top is the Taft Point Trailhead.
Taft Point and The Fissures
Of all the hikes in Yosemite National Park we want to go back for, Taft Point and The Fissures is the one.
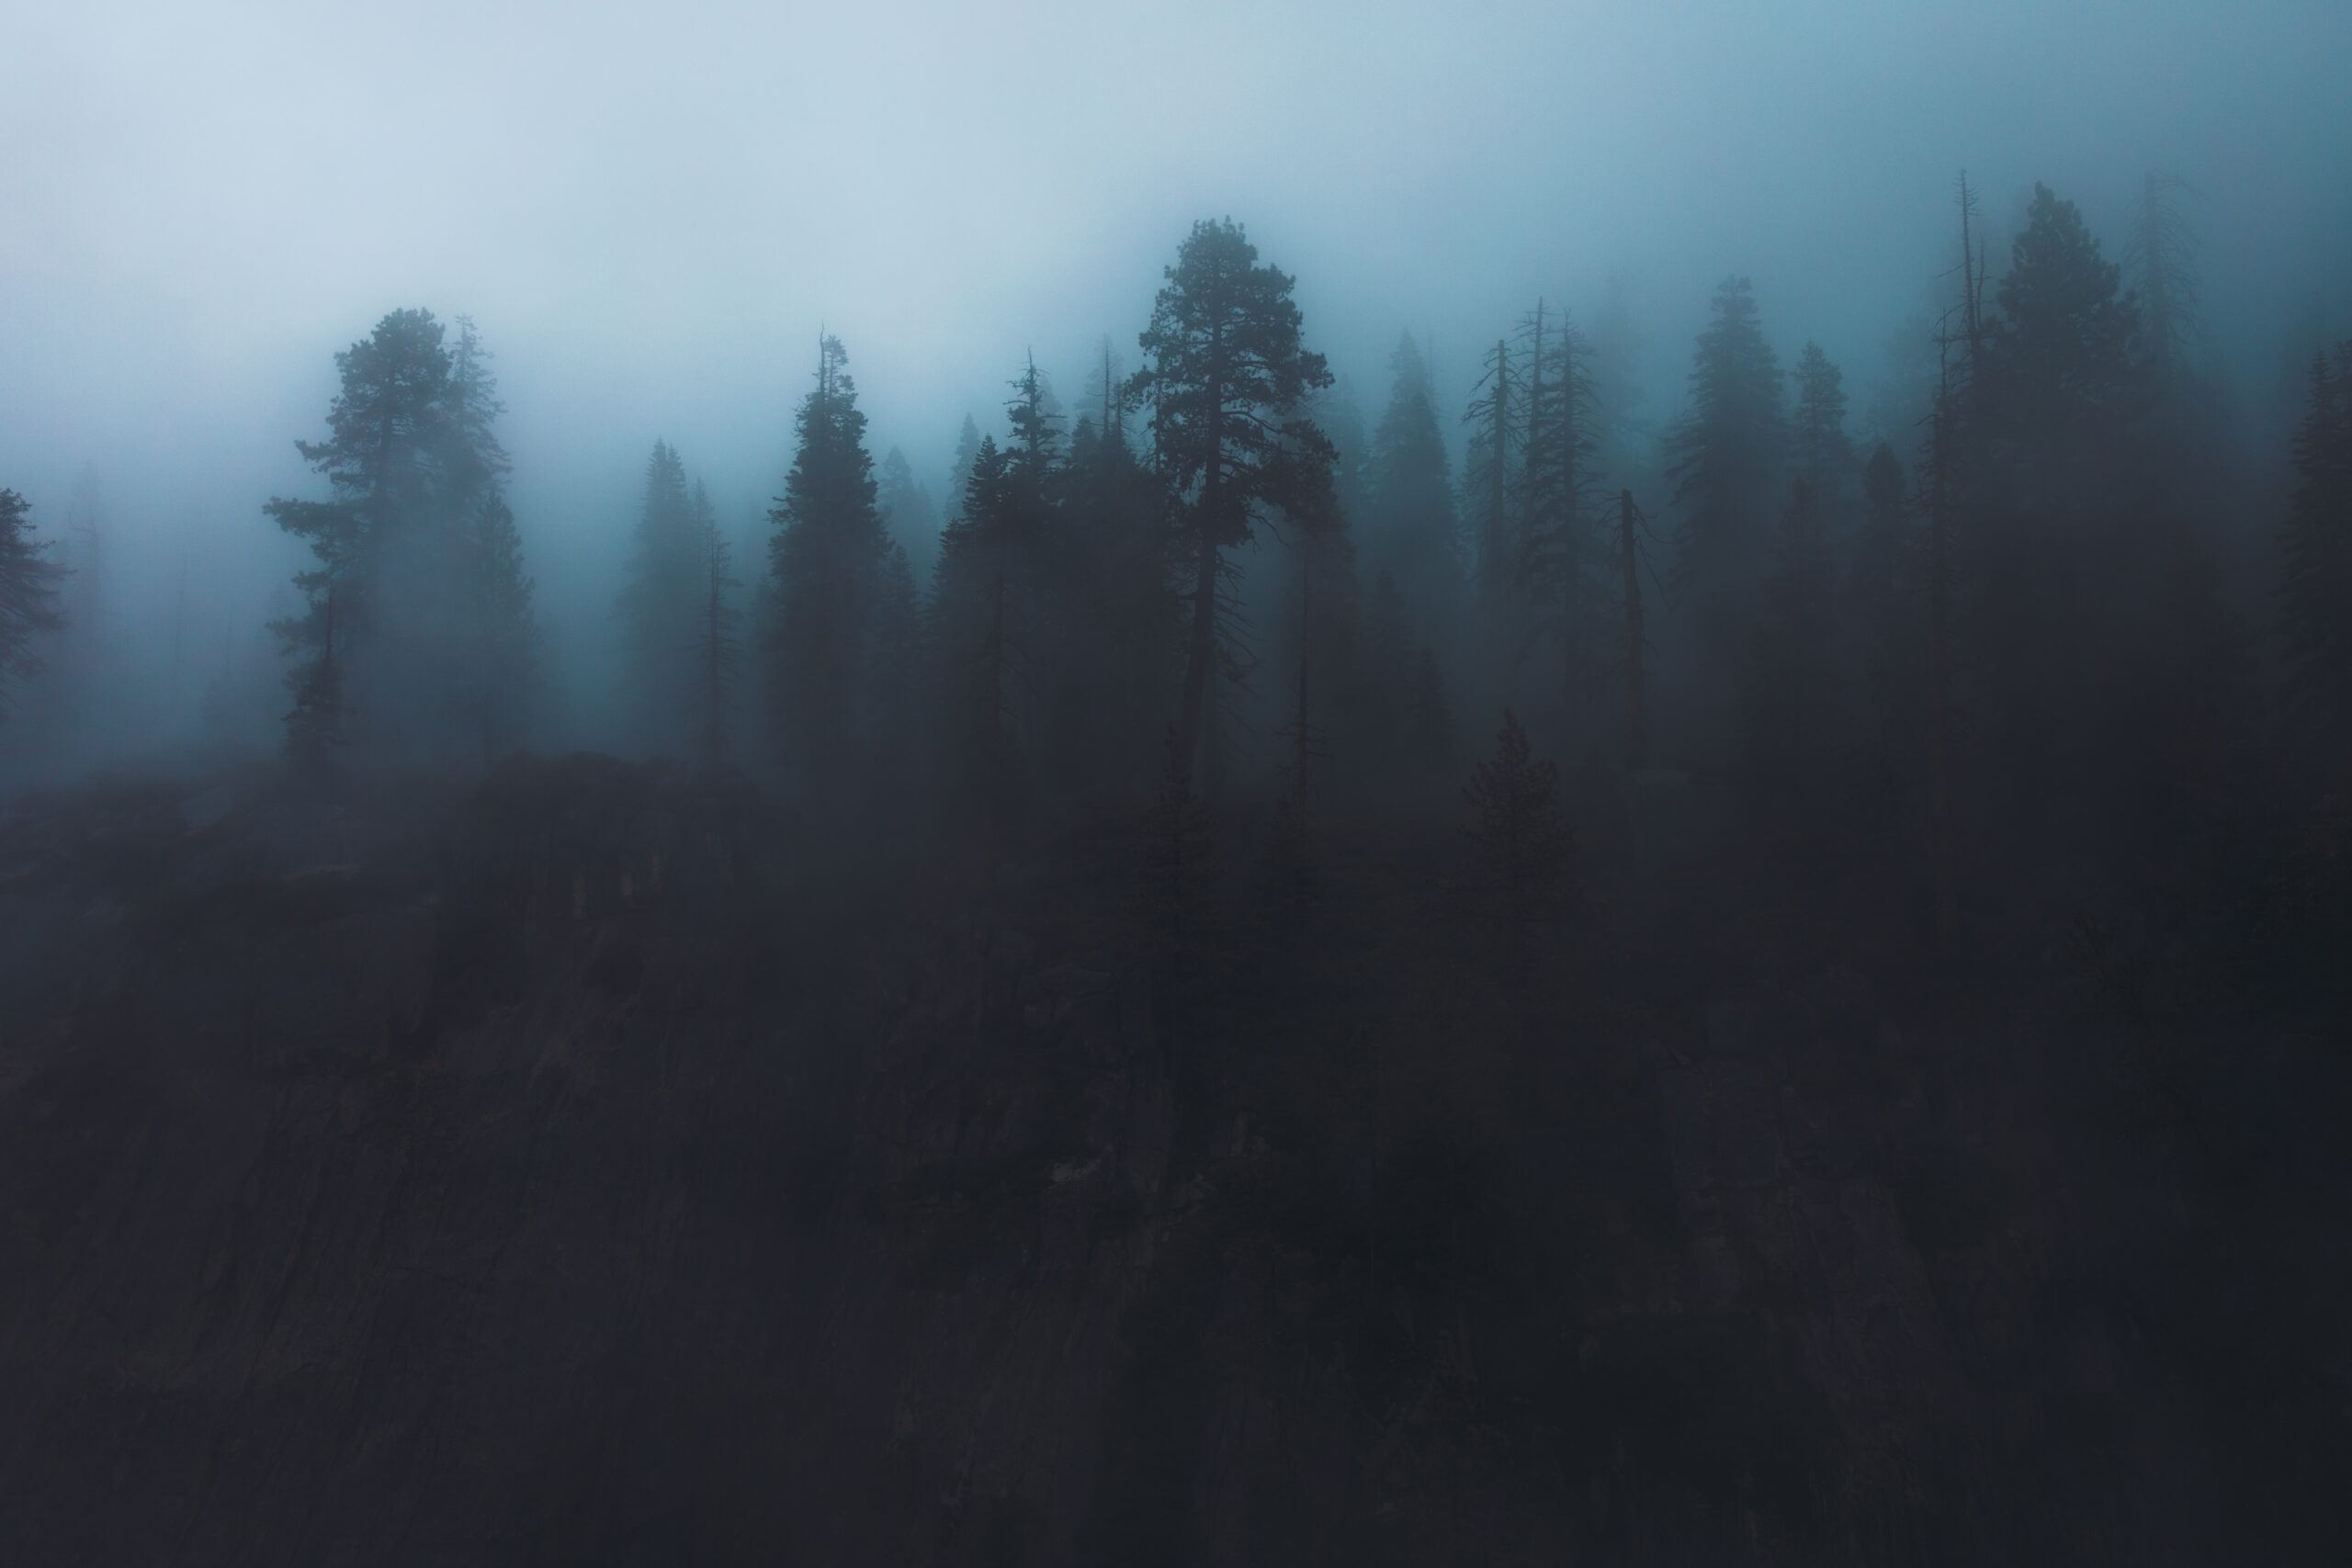
Let’s start by saying we hiked the path but we were not rewarded with the spectacular view. It was unseasonably foggy during our hike.
So even though the hike was lovely, challenging, and interesting, the reward at the end was… dense f*cking fog. No other way to say it.
HOWEVER! If you are lucky, you will get one of the most memorable views in Yosemite.
The hike itself is 2.3 miles out and back. Moderately challenging. It should take you about 1.5 hours to complete.
The first part of the hike is through a dense forest. It reminded us quite a bit of Washington State. Tall trees. Mossy growth all around.
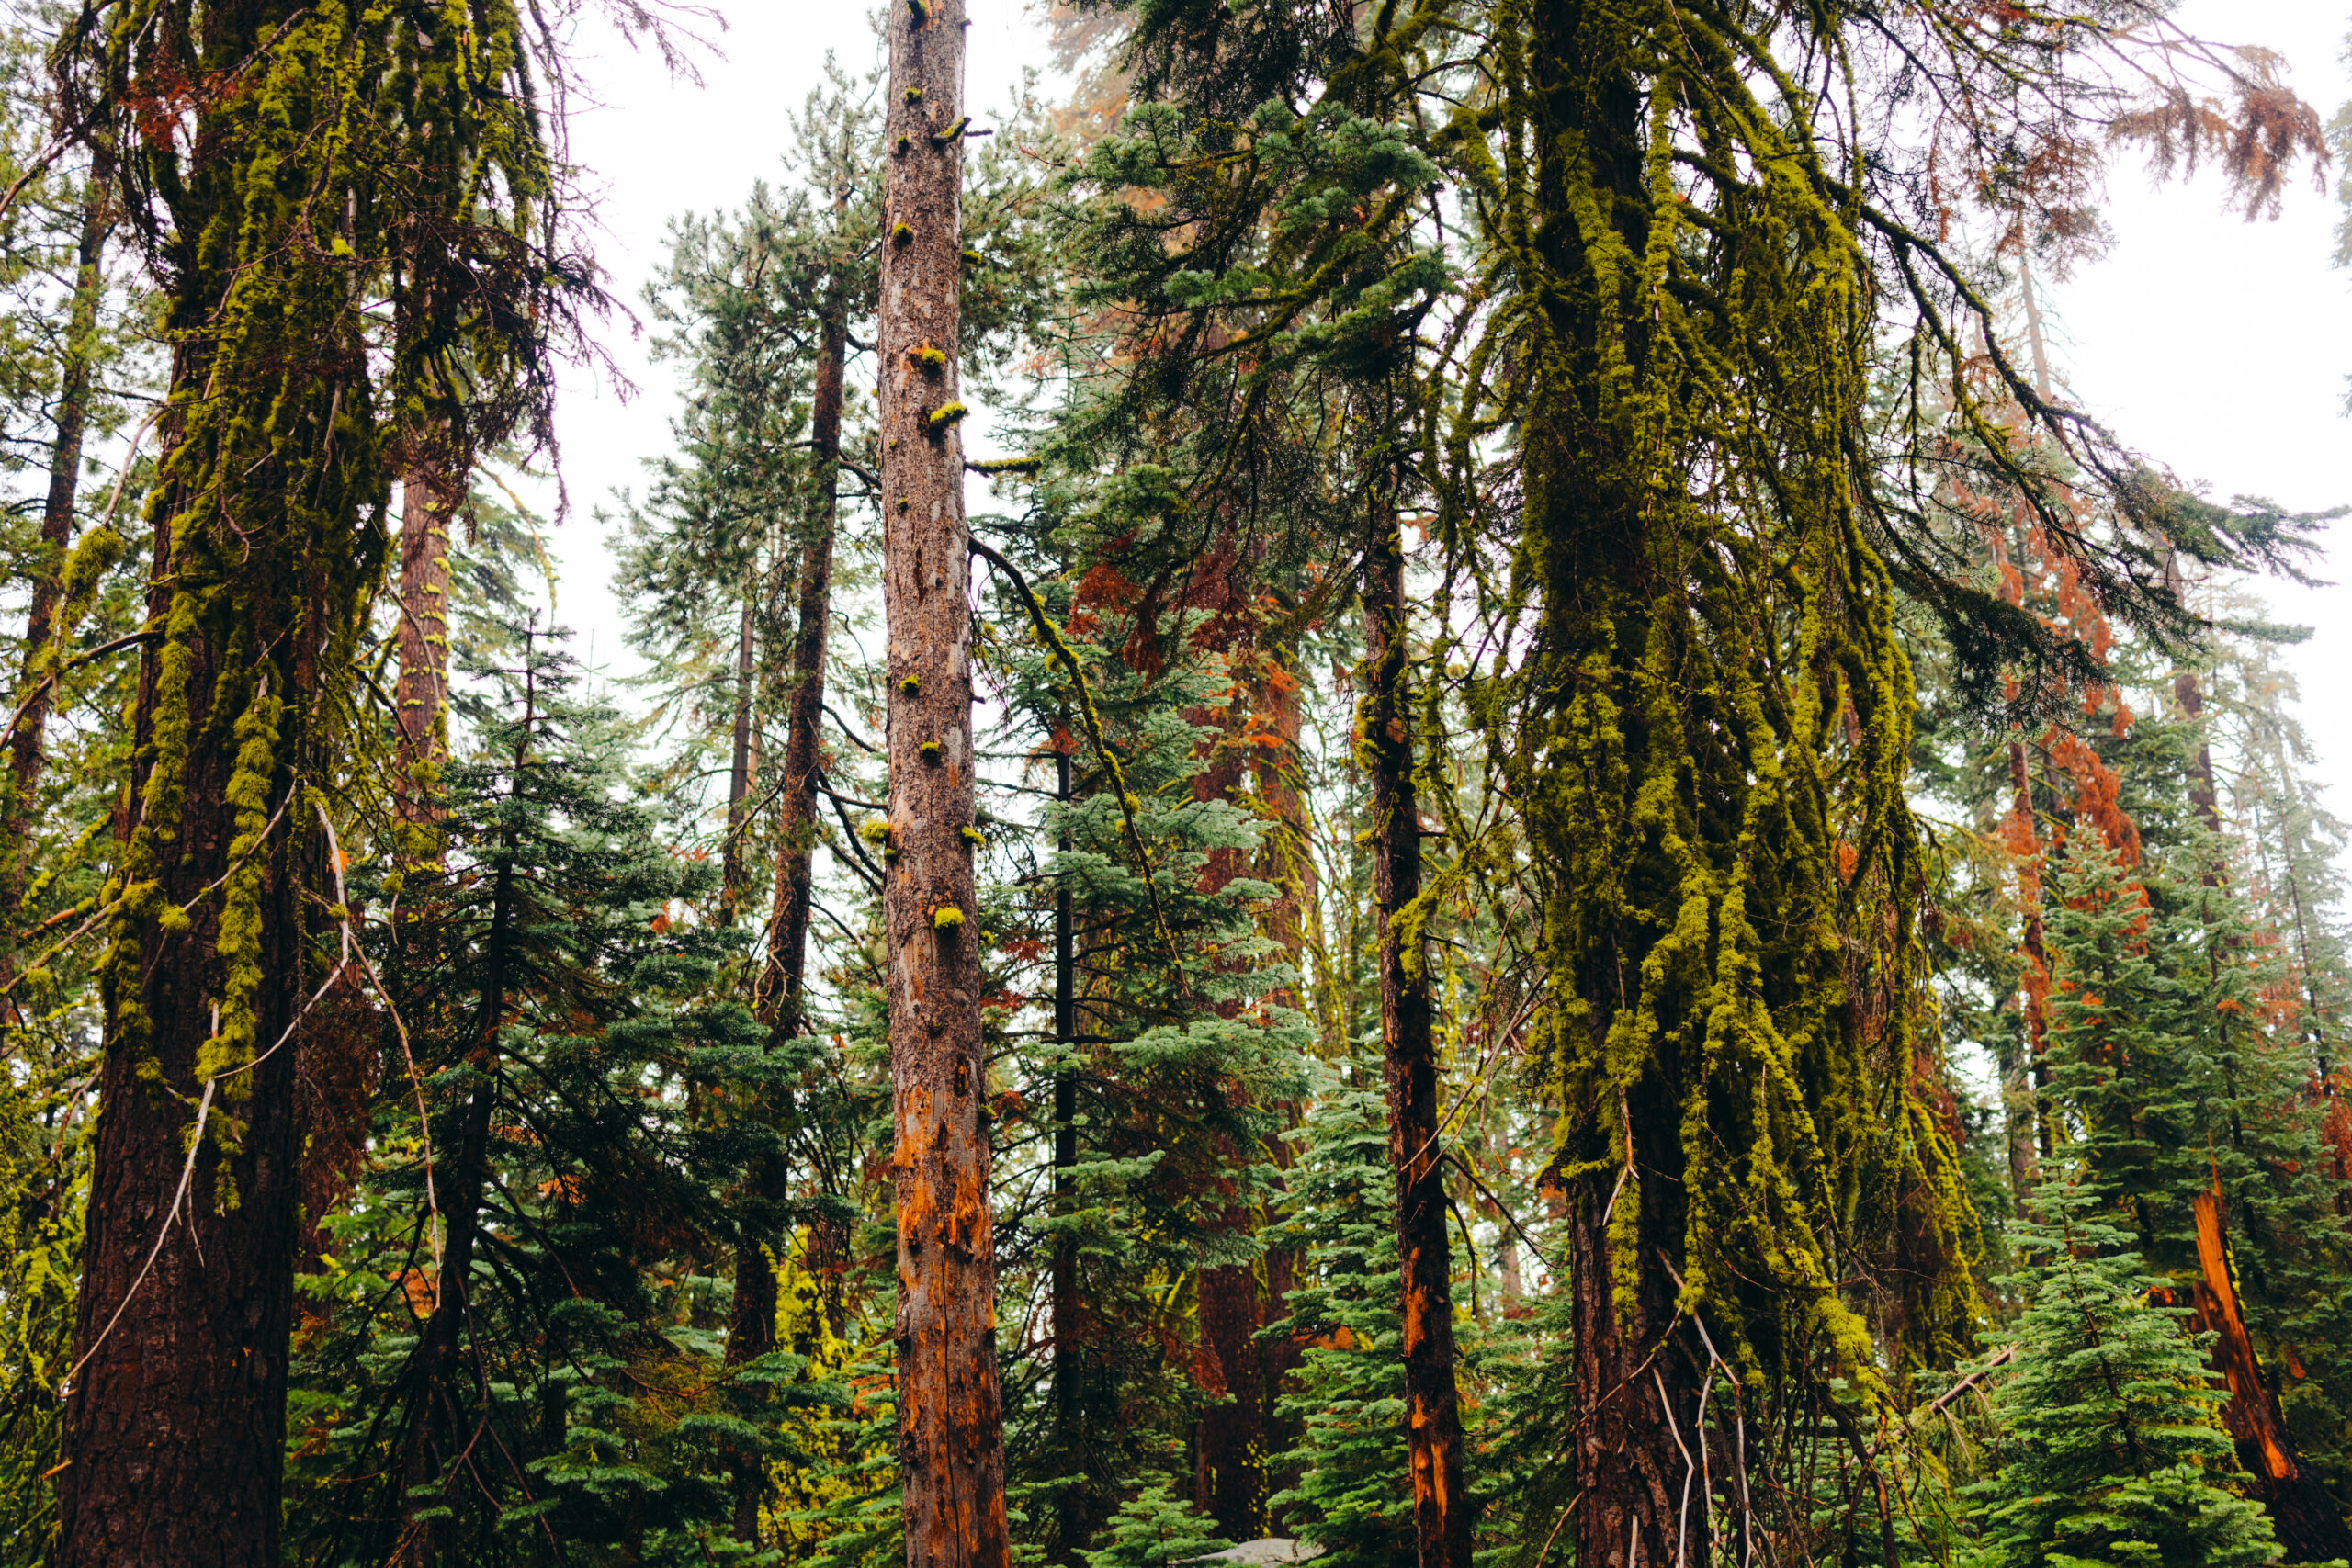
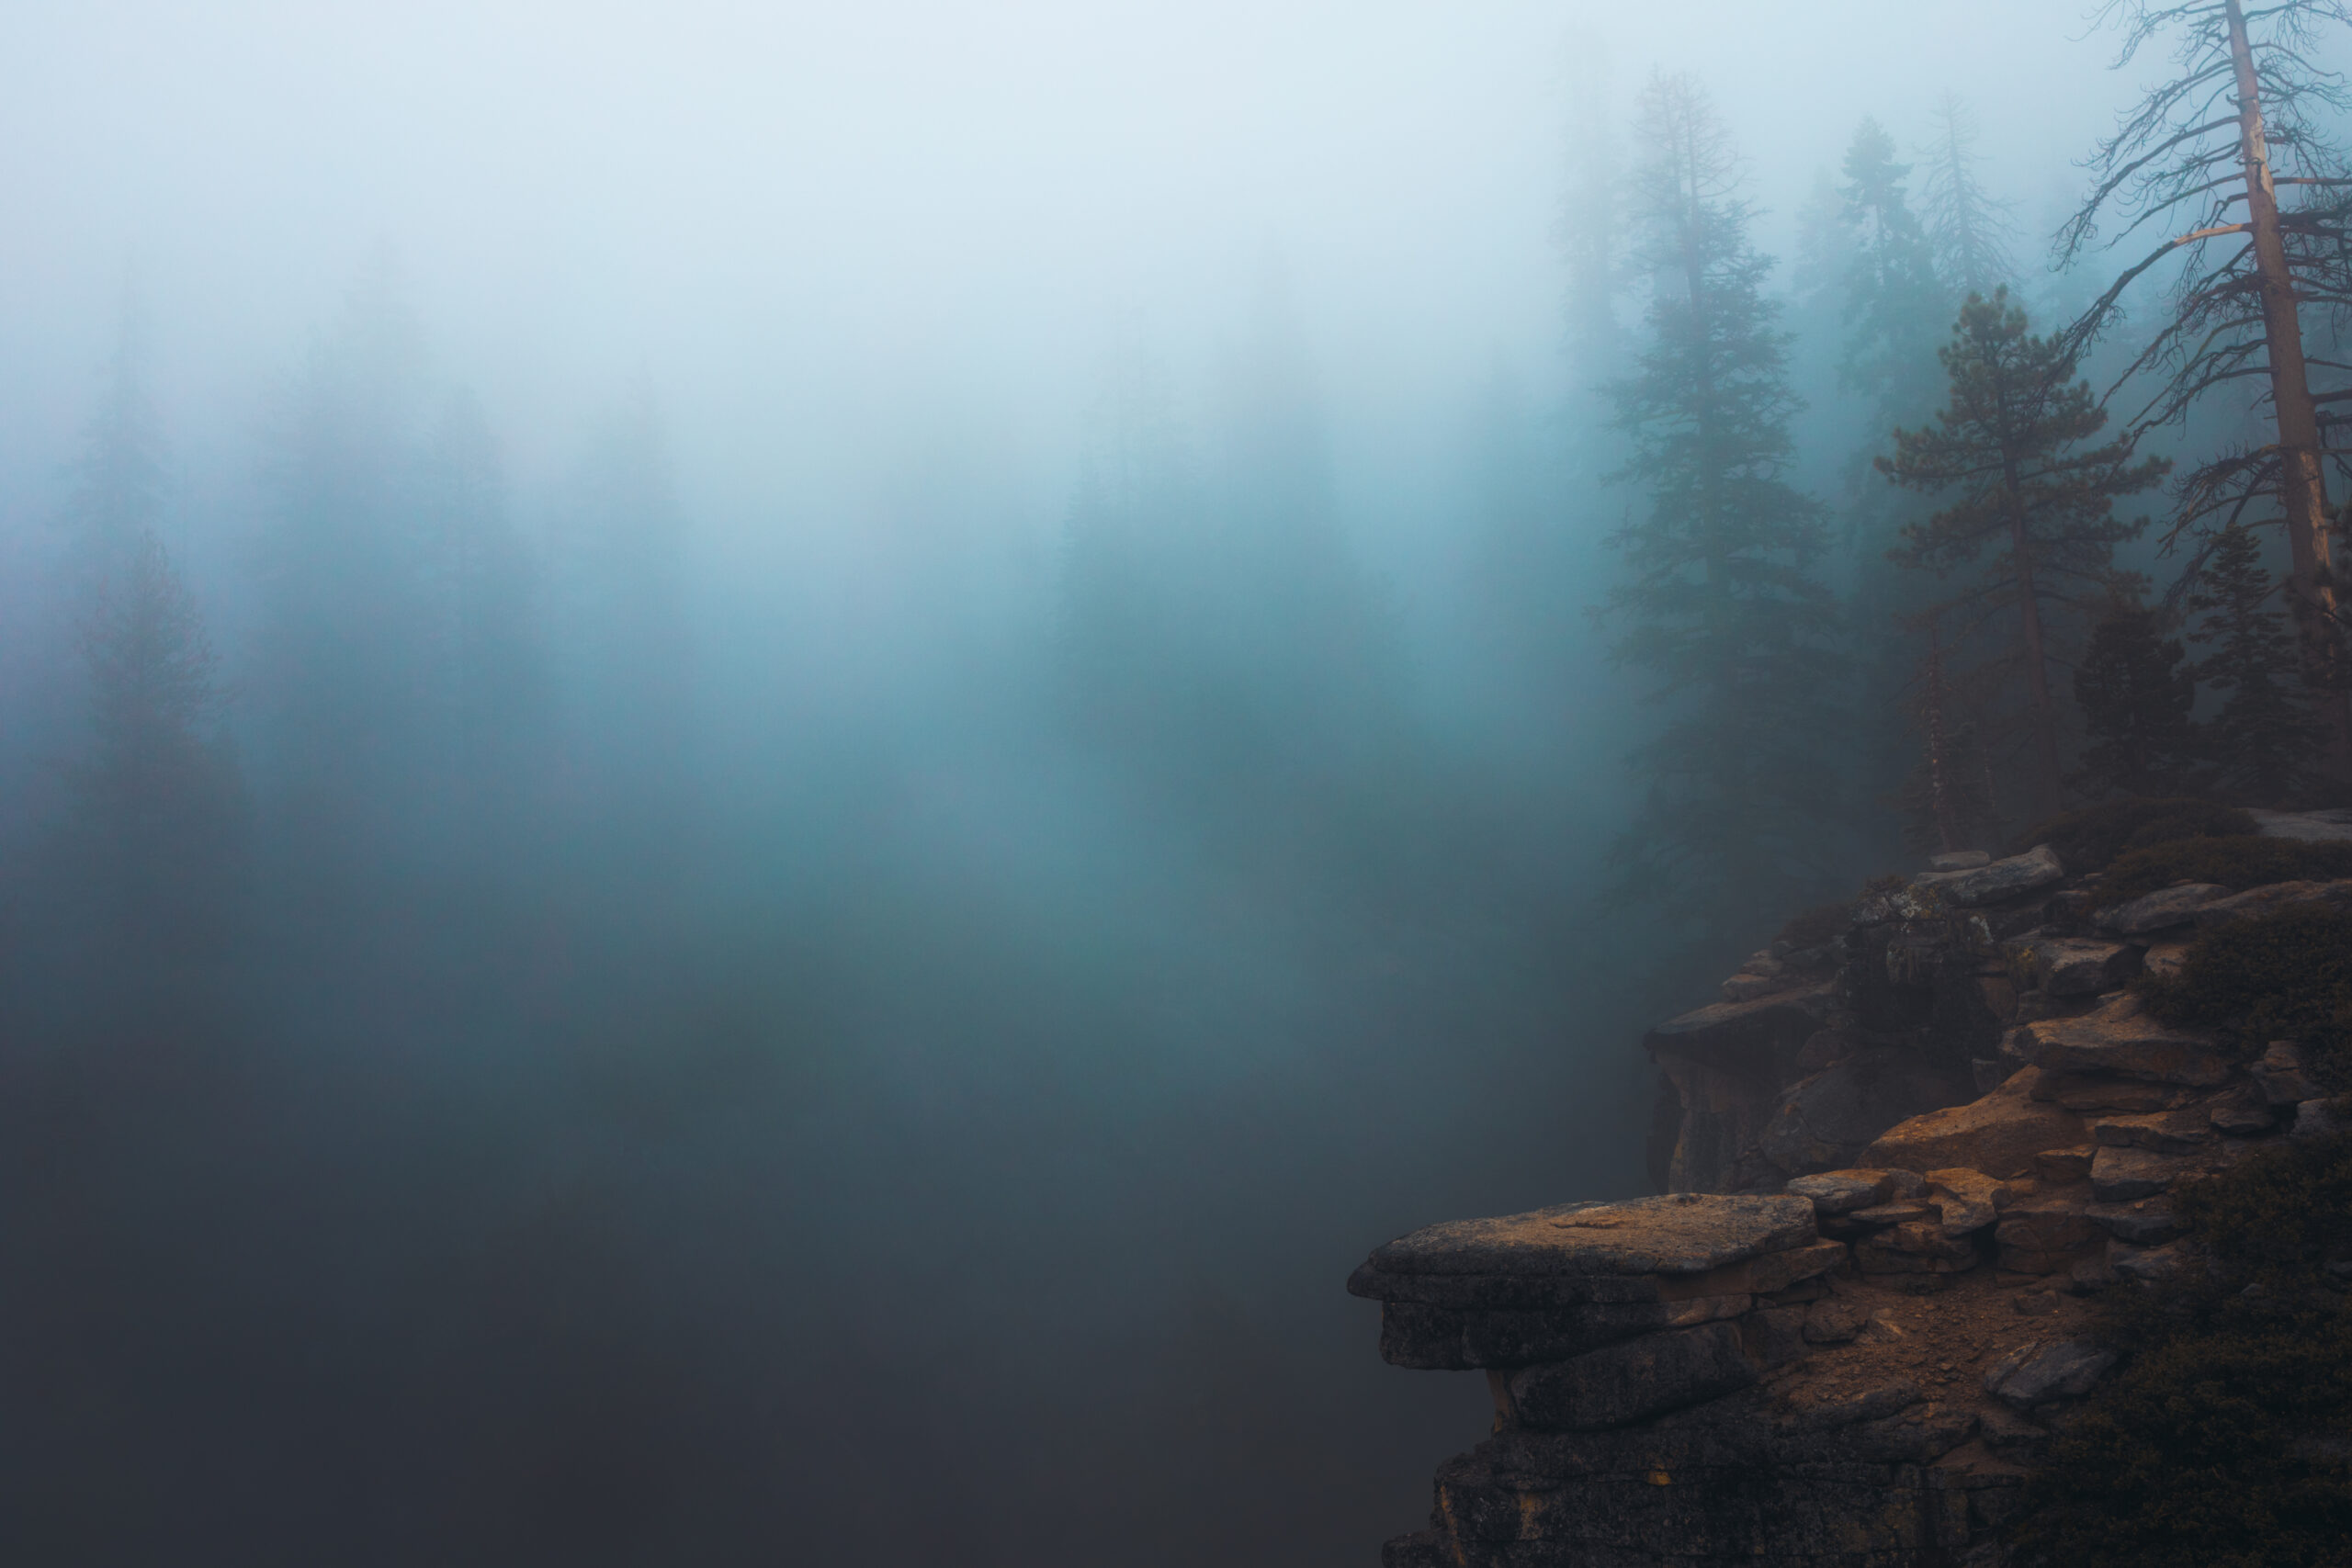
You’ll eventually come out of the forest to a clearing of rock. Hike along the right side to get a look at The Fissures.
These steep drops along the granite are terrifyingly incredible. As we saw the fissures through the fog, we couldn’t help but feel we were standing at the edge of the world.
Next, make your way out to the point.
You’ll find a rickety old railing separating you from a 7,500 foot drop.
Again, our view was foggy. But that almost made it more thrilling. Knowing that just behind the fog was a steep drop and view of Yosemite Valley, made our hearts pound.
But if you’re there on a clear day, there’s nothing quite like this view. Look at it.

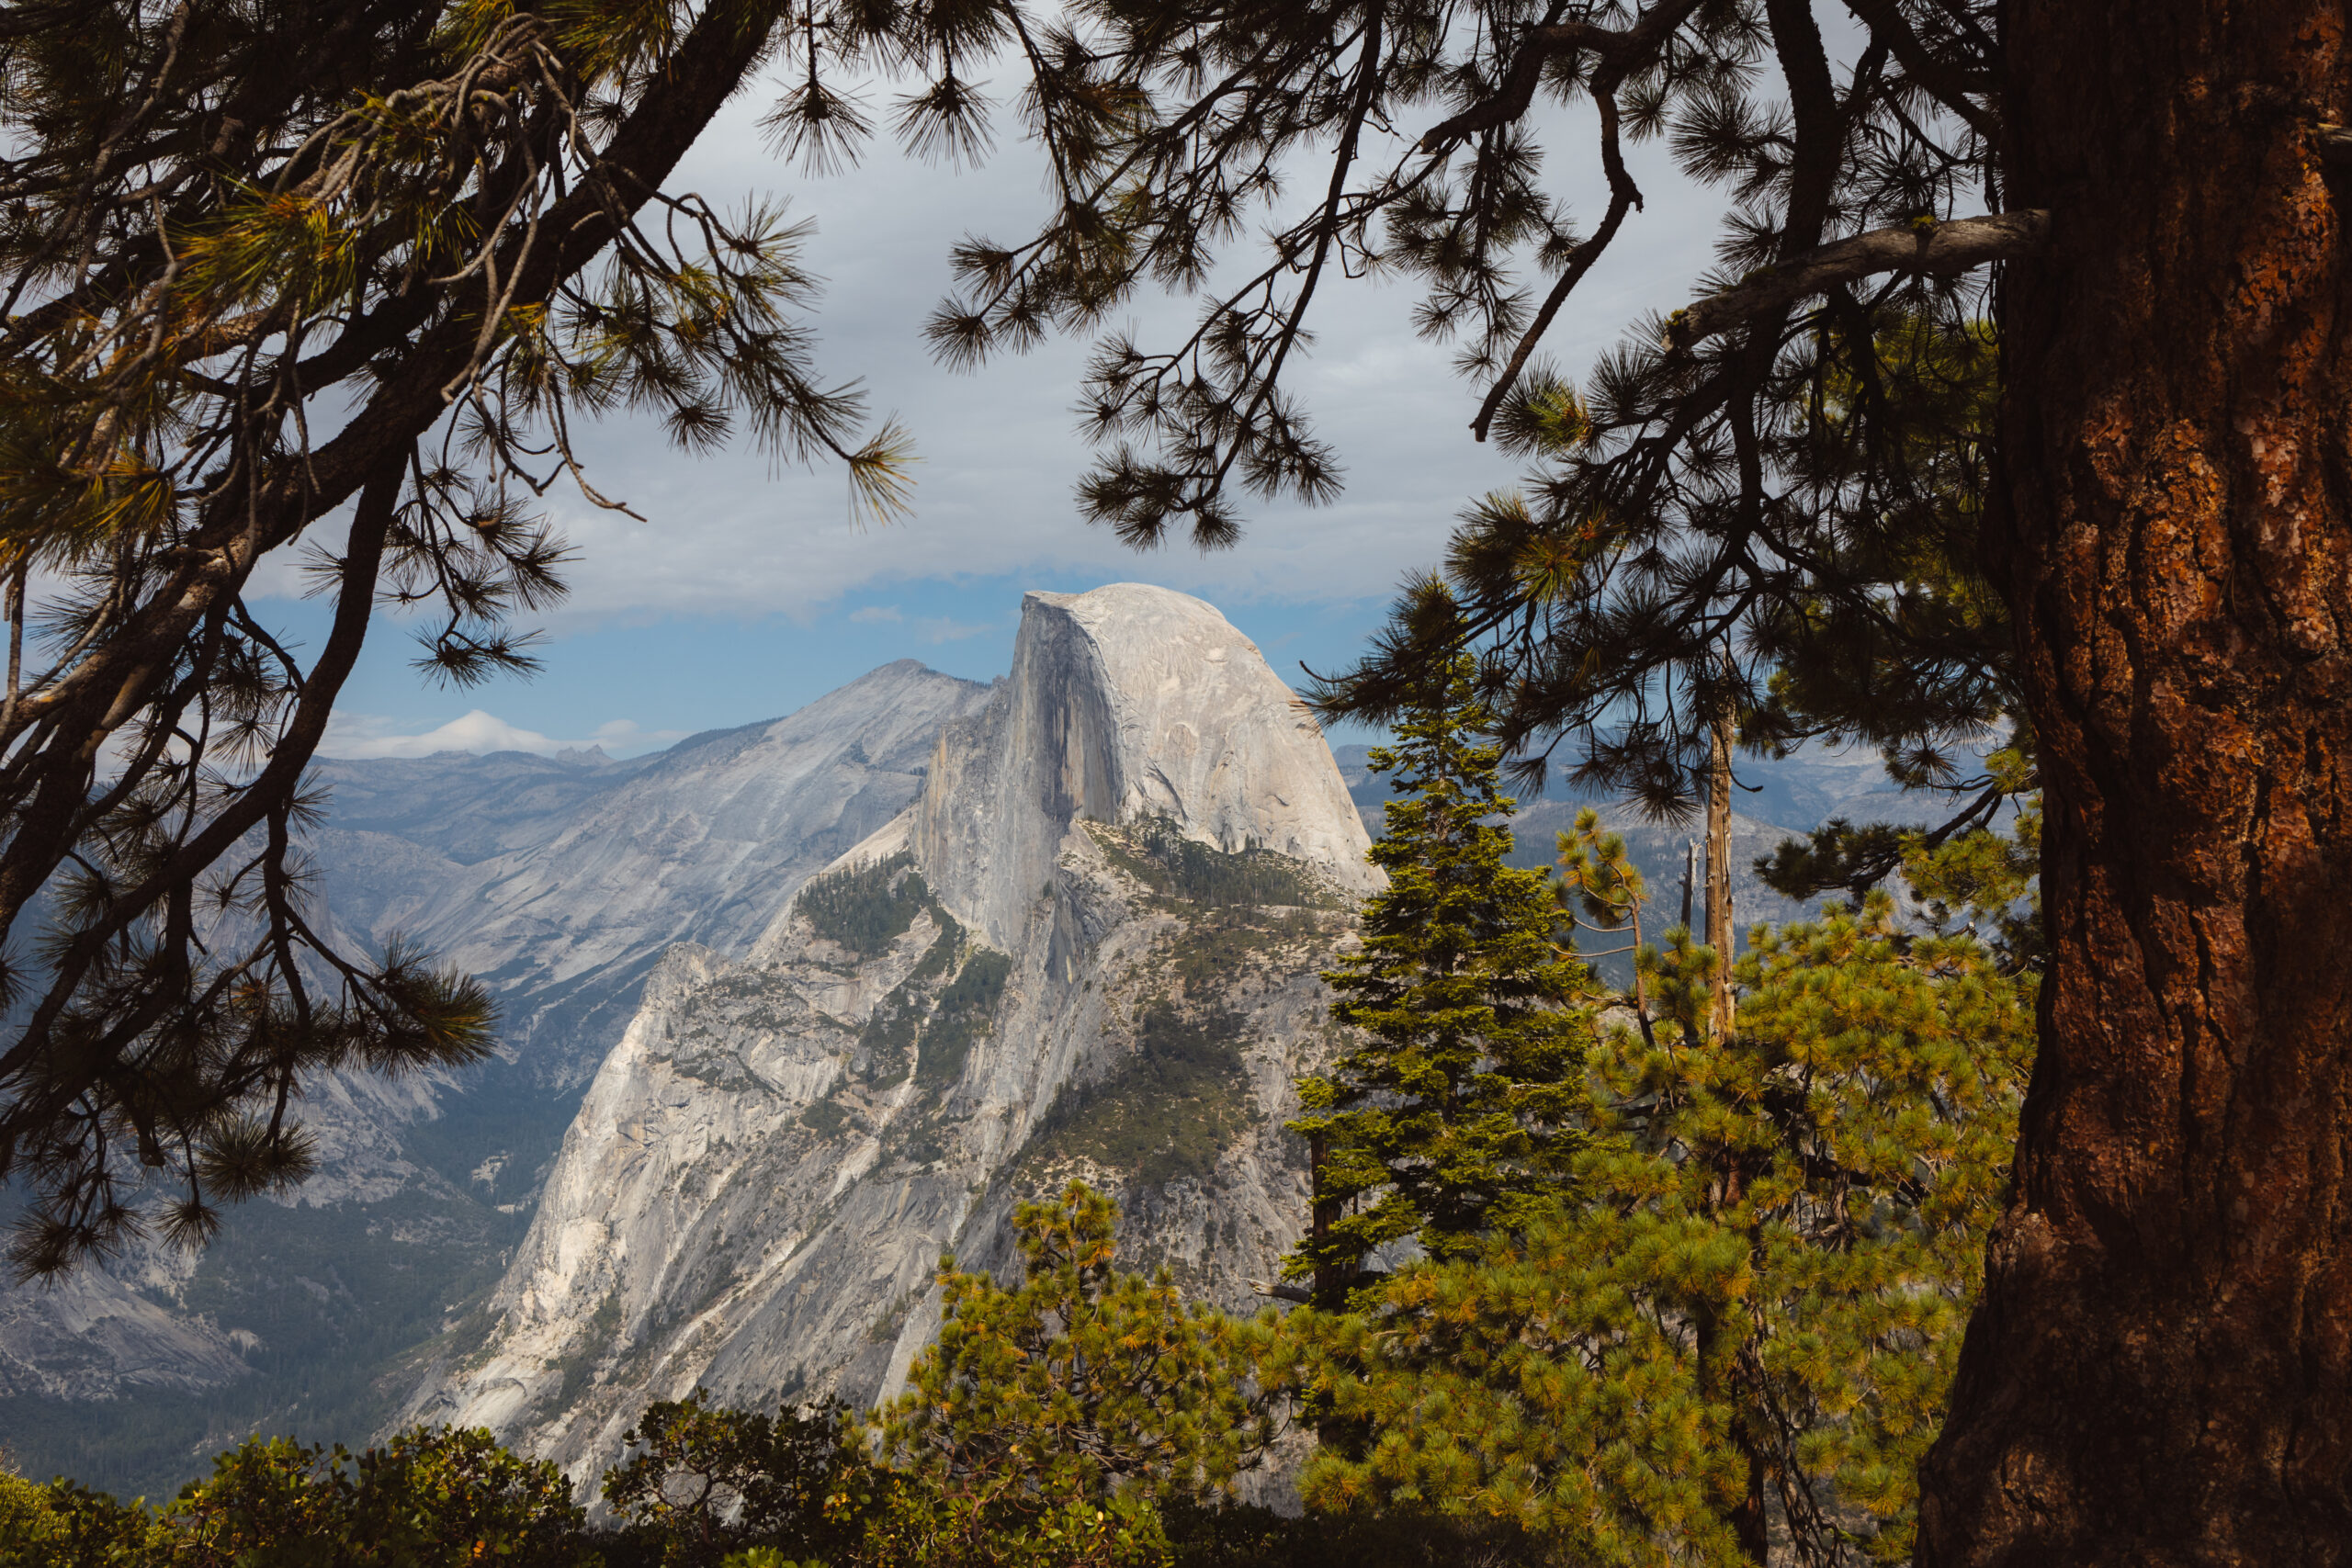
Glacier Point
And finally, my favorite view in all of Yosemite National Park – Glacier Point.
I don’t know if I have enough words (ironic for a blog post), so here’s a gallery of my photos from Glacier Point. Tell me what you think.
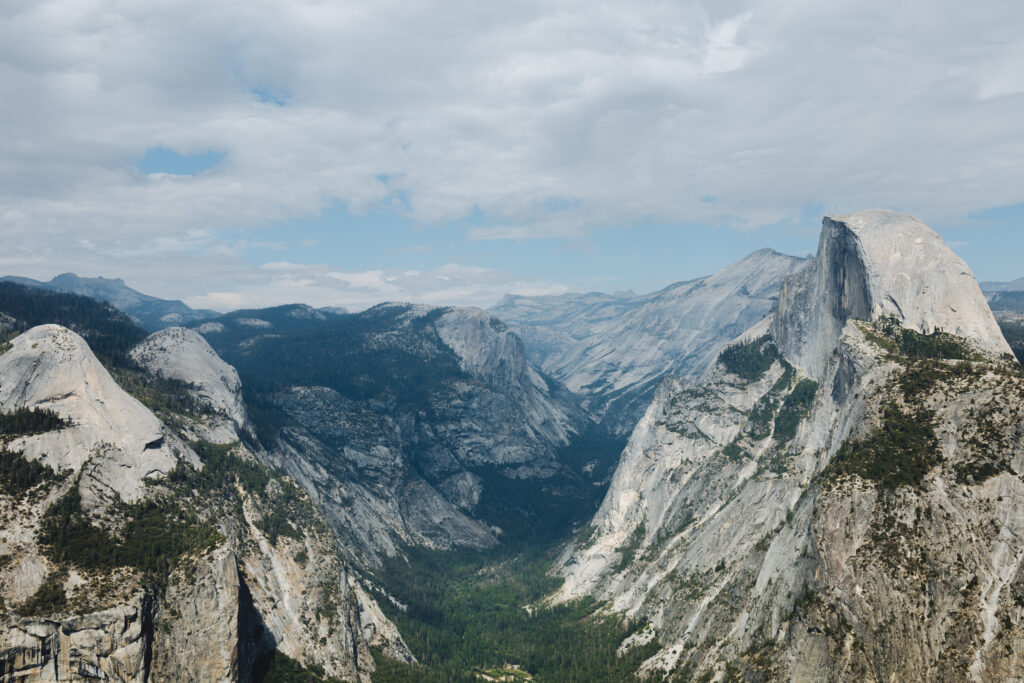


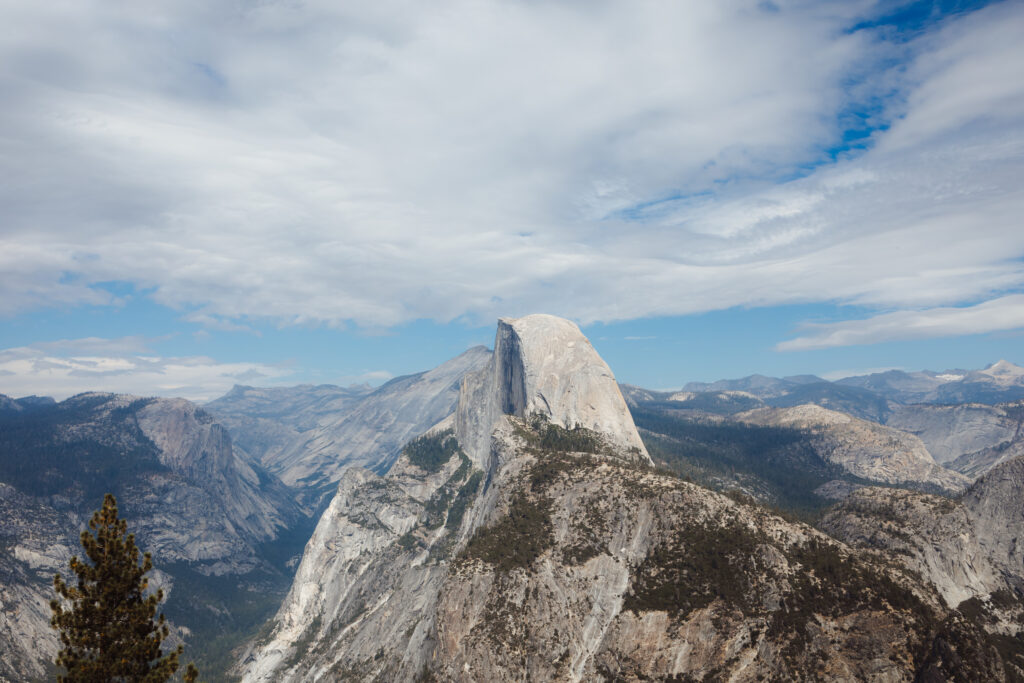


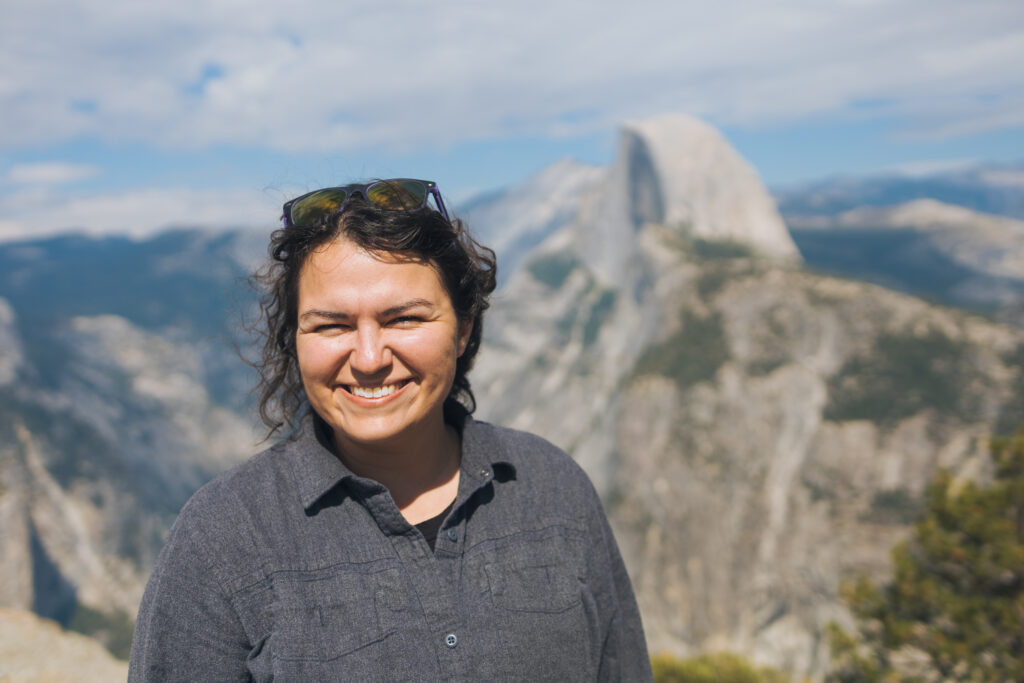
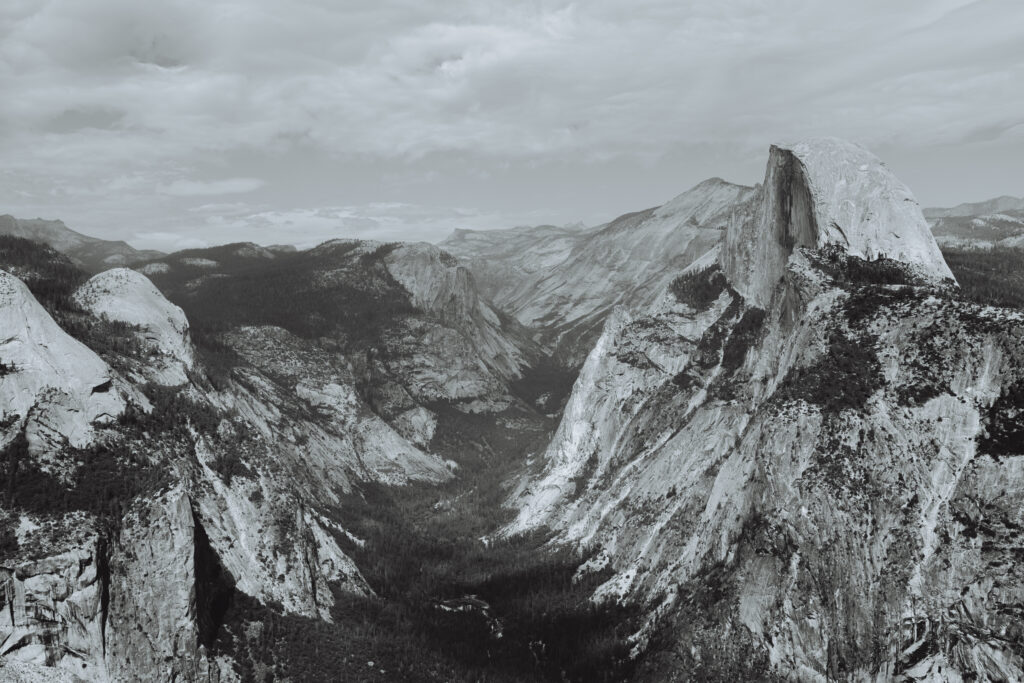
This is perhaps the most iconic view at Yosemite National Park.
You can see just about everything from here:
- Half Dome
- Nevada Falls
- Yosemite Valley
- The vast wilderness
I want to bottle this up. In fact, we’re working on printing out one of these photos to hang in our house.
To say a bit more:
Meander around Glacier Point. There are multiple lookouts that are very easy to get to.
You can sit in the amphitheater, walk up to the lookout, and take it in from all the perspectives.
You could also start multiple hikes from here. We wouldn’t recommend it so late in the day (and especially after your long day), but you could jump on the Four Mile Trail or the Panorama Trail. Each of which will lead you back down to the valley.
If there’s one reason to go back to Yosemite, it’s to climb back up to Glacier Point. This is the view I’ll remember for a long time. Just look at my smirk. Don’t you want to just slap it right off me?
Let’s Go Home
I don’t know where you’re staying, but I hope it’s not too far.
Your 1 day in Yosemite has been full:
Hikes
Waterfalls
Trees
And some of the most scenic views you’ll get anywhere in the world.
If we ever get one more day to explore Yosemite, I’m pulling up this blog post and helping myself.
Until then, I hope start planning a trip to Yosemite or find your next park soon!
And if you’re looking for recommendations, send us an email at [email protected] we’ll respond with something interesting (and just be ecstatic that you made it this far in the blog post!!)
Peace out and go enjoy the great outdoors!